

 实现内联小部件
在本教程中,您将学习如何实现内联小部件。您将构建一个“占位符”功能,允许用户将预定义的占位符(如日期或姓氏)插入文档中。
我们有一个此功能的官方实现!
虽然本教程是出于学习目的而创建的,但它只提供了一个基本、简化的解决方案。我们有一个此机制的官方实现,称为合并字段功能。它比这里提供的解决方案更强大,并提供许多配置选项。
首先,您将使用小部件实用程序和转换来定义此功能的行为。稍后,您将使用下拉列表实用程序创建一个下拉列表,该下拉列表将允许插入新的占位符。您还将学习如何使用编辑器配置来定义允许的占位符名称。
如果您想在深入研究之前查看本教程的最终产品,请查看演示.
# 开始之前
本指南假设您熟悉在实现块级小部件教程中介绍的小部件概念,尤其是让我们开始和插件结构部分。本教程还将引用CKEditor 5 架构中的各种概念。
# 引导项目
最简单的入门方法是使用以下命令获取入门项目。
npx -y degit ckeditor/ckeditor5-tutorials-examples/inline-widget/starter-files inline-widget
cd inline-widget

npm install
npm run dev
这将创建一个名为inline-widget的新目录,其中包含必要的文件。npm install命令将安装所有依赖项,npm run dev将启动开发服务器。
main.js文件中创建了一些基本插件的编辑器。
首先,让我们定义Placeholder插件。该项目应具有以下所示的结构
├── main.js
├── index.html
├── node_modules
├── package.json
├── placeholder
│   ├── placeholder.js
│   ├── placeholdercommand.js
│   ├── placeholderediting.js
│   ├── placeholderui.js
│   └── theme
│       └── placeholder.css
└─ ...
您可以看到,占位符功能具有已建立的插件结构:主(胶水)插件 (placeholder/placeholder.js)、“编辑” (placeholder/placeholderediting.js) 和“UI” (placeholder/placeholderui.js) 部分。
主(胶水)插件
// placeholder/placeholder.js

import { Plugin } from 'ckeditor5';

import PlaceholderEditing from './placeholderediting';
import PlaceholderUI from './placeholderui';

export default class Placeholder extends Plugin {
    static get requires() {
        return [ PlaceholderEditing, PlaceholderUI ];
    }
}
UI 部分(目前为空)
// placeholder/placeholderui.js

import { Plugin } from 'ckeditor5';

export default class PlaceholderUI extends Plugin {
    init() {
        console.log( 'PlaceholderUI#init() got called' );
    }
}
以及编辑部分(目前为空)
// placeholder/placeholderediting.js

import { Plugin } from 'ckeditor5';

export default class PlaceholderEditing extends Plugin {
    init() {
        console.log( 'PlaceholderEditing#init() got called' );
    }
}
最后,您需要在 main.js 文件中加载 Placeholder 插件
// main.js

import Placeholder from './placeholder/placeholder';

ClassicEditor
    .create( document.querySelector( '#editor' ), {
        plugins: [ Essentials, Paragraph, Heading, List, Bold, Italic, Placeholder ],
        toolbar: [ 'heading', 'bold', 'italic', 'numberedList', 'bulletedList', '|', 'undo', 'redo' ]
    } );
此时,您可以运行开发服务器,并在浏览器控制台中看到插件正在初始化。
# 模型和视图层
占位符功能将定义为内联(类似文本)元素,因此它将插入到其他允许文本的编辑器块中,例如<paragraph>。占位符将具有name属性。这意味着包含一些文本和占位符的模型将如下所示
<paragraph>
    Hello <placeholder name="name"></placeholder>!
</paragraph>
# 定义架构
<placeholder>元素应在$text中被视为对象,因此必须使用inheritAllFrom: '$inlineObject'来定义它。您还需要name属性。
您还将利用此机会导入主题文件 (theme/placeholder.css)。
// placeholder/placeholderediting.js

import { Plugin } from 'ckeditor5';

import './theme/placeholder.css';                                              // ADDED

export default class PlaceholderEditing extends Plugin {
    init() {
        console.log( 'PlaceholderEditing#init() got called' );

        this._defineSchema();                                                  // ADDED
    }

    _defineSchema() {                                                          // ADDED
        const schema = this.editor.model.schema;

        schema.register( 'placeholder', {
            // Behaves like a self-contained inline object (e.g. an inline image)
            // allowed in places where $text is allowed (e.g. in paragraphs).
            // The inline widget can have the same attributes as text (for example linkHref, bold).
            inheritAllFrom: '$inlineObject',

            // The placeholder can have many types, like date, name, surname, etc:
            allowAttributes: [ 'name' ]
        } );
    }
}
架构已定义,因此现在您可以定义模型-视图转换器。
# 定义转换器
转换器的 HTML 结构(数据输出)将是一个具有placeholder类的<span>。<span>内的文本将是占位符的名称。
<span class="placeholder">{name}</span>
- 上投转换。此视图到模型转换器将查找具有
placeholder类的<span>,读取<span>的文本并创建具有相应name属性设置的模型<placeholder>元素。 - 下投转换。模型到视图转换对于“编辑”和“数据”管道将略有不同,因为“编辑下投”管道将使用小部件实用程序在编辑视图中启用特定于小部件的行为。在这两个管道中,元素将使用相同的结构呈现。
import { Plugin, Widget, toWidget } from 'ckeditor5';

import './theme/placeholder.css';

export default class PlaceholderEditing extends Plugin {
    static get requires() {                                                    // ADDED
        return [ Widget ];
    }

    init() {
        console.log( 'PlaceholderEditing#init() got called' );

        this._defineSchema();
        this._defineConverters();                                              // ADDED
    }

    _defineSchema() {
        // Previously registered schema.
        // ...
    }

    _defineConverters() {                                                      // ADDED
        const conversion = this.editor.conversion;

        conversion.for( 'upcast' ).elementToElement( {
            view: {
                name: 'span',
                classes: [ 'placeholder' ]
            },
            model: ( viewElement, { writer: modelWriter } ) => {
                // Extract the "name" from "{name}".
                const name = viewElement.getChild( 0 ).data.slice( 1, -1 );

                return modelWriter.createElement( 'placeholder', { name } );
            }
        } );

        conversion.for( 'editingDowncast' ).elementToElement( {
            model: 'placeholder',
            view: ( modelItem, { writer: viewWriter } ) => {
                const widgetElement = createPlaceholderView( modelItem, viewWriter );

                // Enable widget handling on a placeholder element inside the editing view.
                return toWidget( widgetElement, viewWriter );
            }
        } );

        conversion.for( 'dataDowncast' ).elementToElement( {
            model: 'placeholder',
            view: ( modelItem, { writer: viewWriter } ) => createPlaceholderView( modelItem, viewWriter )
        } );

        // Helper method for both downcast converters.
        function createPlaceholderView( modelItem, viewWriter ) {
            const name = modelItem.getAttribute( 'name' );

            const placeholderView = viewWriter.createContainerElement( 'span', {
                class: 'placeholder'
            } );

            // Insert the placeholder name (as a text).
            const innerText = viewWriter.createText( '{' + name + '}' );
            viewWriter.insert( viewWriter.createPositionAt( placeholderView, 0 ), innerText );

            return placeholderView;
        }
    }
}
# 功能样式
编辑部分导入./theme/placeholder.css CSS 文件,该文件描述了占位符在编辑视图中的显示方式
/* placeholder/theme/placeholder.css */

.placeholder {
    background: #ffff00;
    padding: 4px 2px;
    outline-offset: -2px;
    line-height: 1em;
    margin: 0 1px;
}

.placeholder::selection {
    display: none;
}
# 命令
占位符功能的命令将在选择处插入<placeholder>元素(如果架构允许)。该命令将接受options.value参数(其他 CKEditor 5 命令也使用此模式)来设置占位符名称。
// placeholder/placeholdercommand.js

import { Command } from 'ckeditor5';

export default class PlaceholderCommand extends Command {
    execute( { value } ) {
        const editor = this.editor;
        const selection = editor.model.document.selection;

        editor.model.change( writer => {
            // Create a <placeholder> element with the "name" attribute (and all the selection attributes)...
            const placeholder = writer.createElement( 'placeholder', {
                ...Object.fromEntries( selection.getAttributes() ),
                name: value
            } );

            // ... and insert it into the document. Put the selection on the inserted element.
            editor.model.insertObject( placeholder, null, null, { setSelection: 'on' } );
        } );
    }

    refresh() {
        const model = this.editor.model;
        const selection = model.document.selection;

        const isAllowed = model.schema.checkChild( selection.focus.parent, 'placeholder' );

        this.isEnabled = isAllowed;
    }
}
导入创建的命令并将其添加到编辑器命令中
// placeholder/placeholderediting.js

import { Plugin, Widget, toWidget  } from 'ckeditor5';

import PlaceholderCommand from './placeholdercommand';                         // ADDED
import './theme/placeholder.css';

export default class PlaceholderEditing extends Plugin {
    static get requires() {
        return [ Widget ];
    }

    init() {
        console.log( 'PlaceholderEditing#init() got called' );

        this._defineSchema();
        this._defineConverters();

        // ADDED
        this.editor.commands.add( 'placeholder', new PlaceholderCommand( this.editor ) );
    }

    _defineSchema() {
        // Previously registered schema.
        // ...
    }

    _defineConverters() {
        // Previously defined converters.
        // ...
    }
}
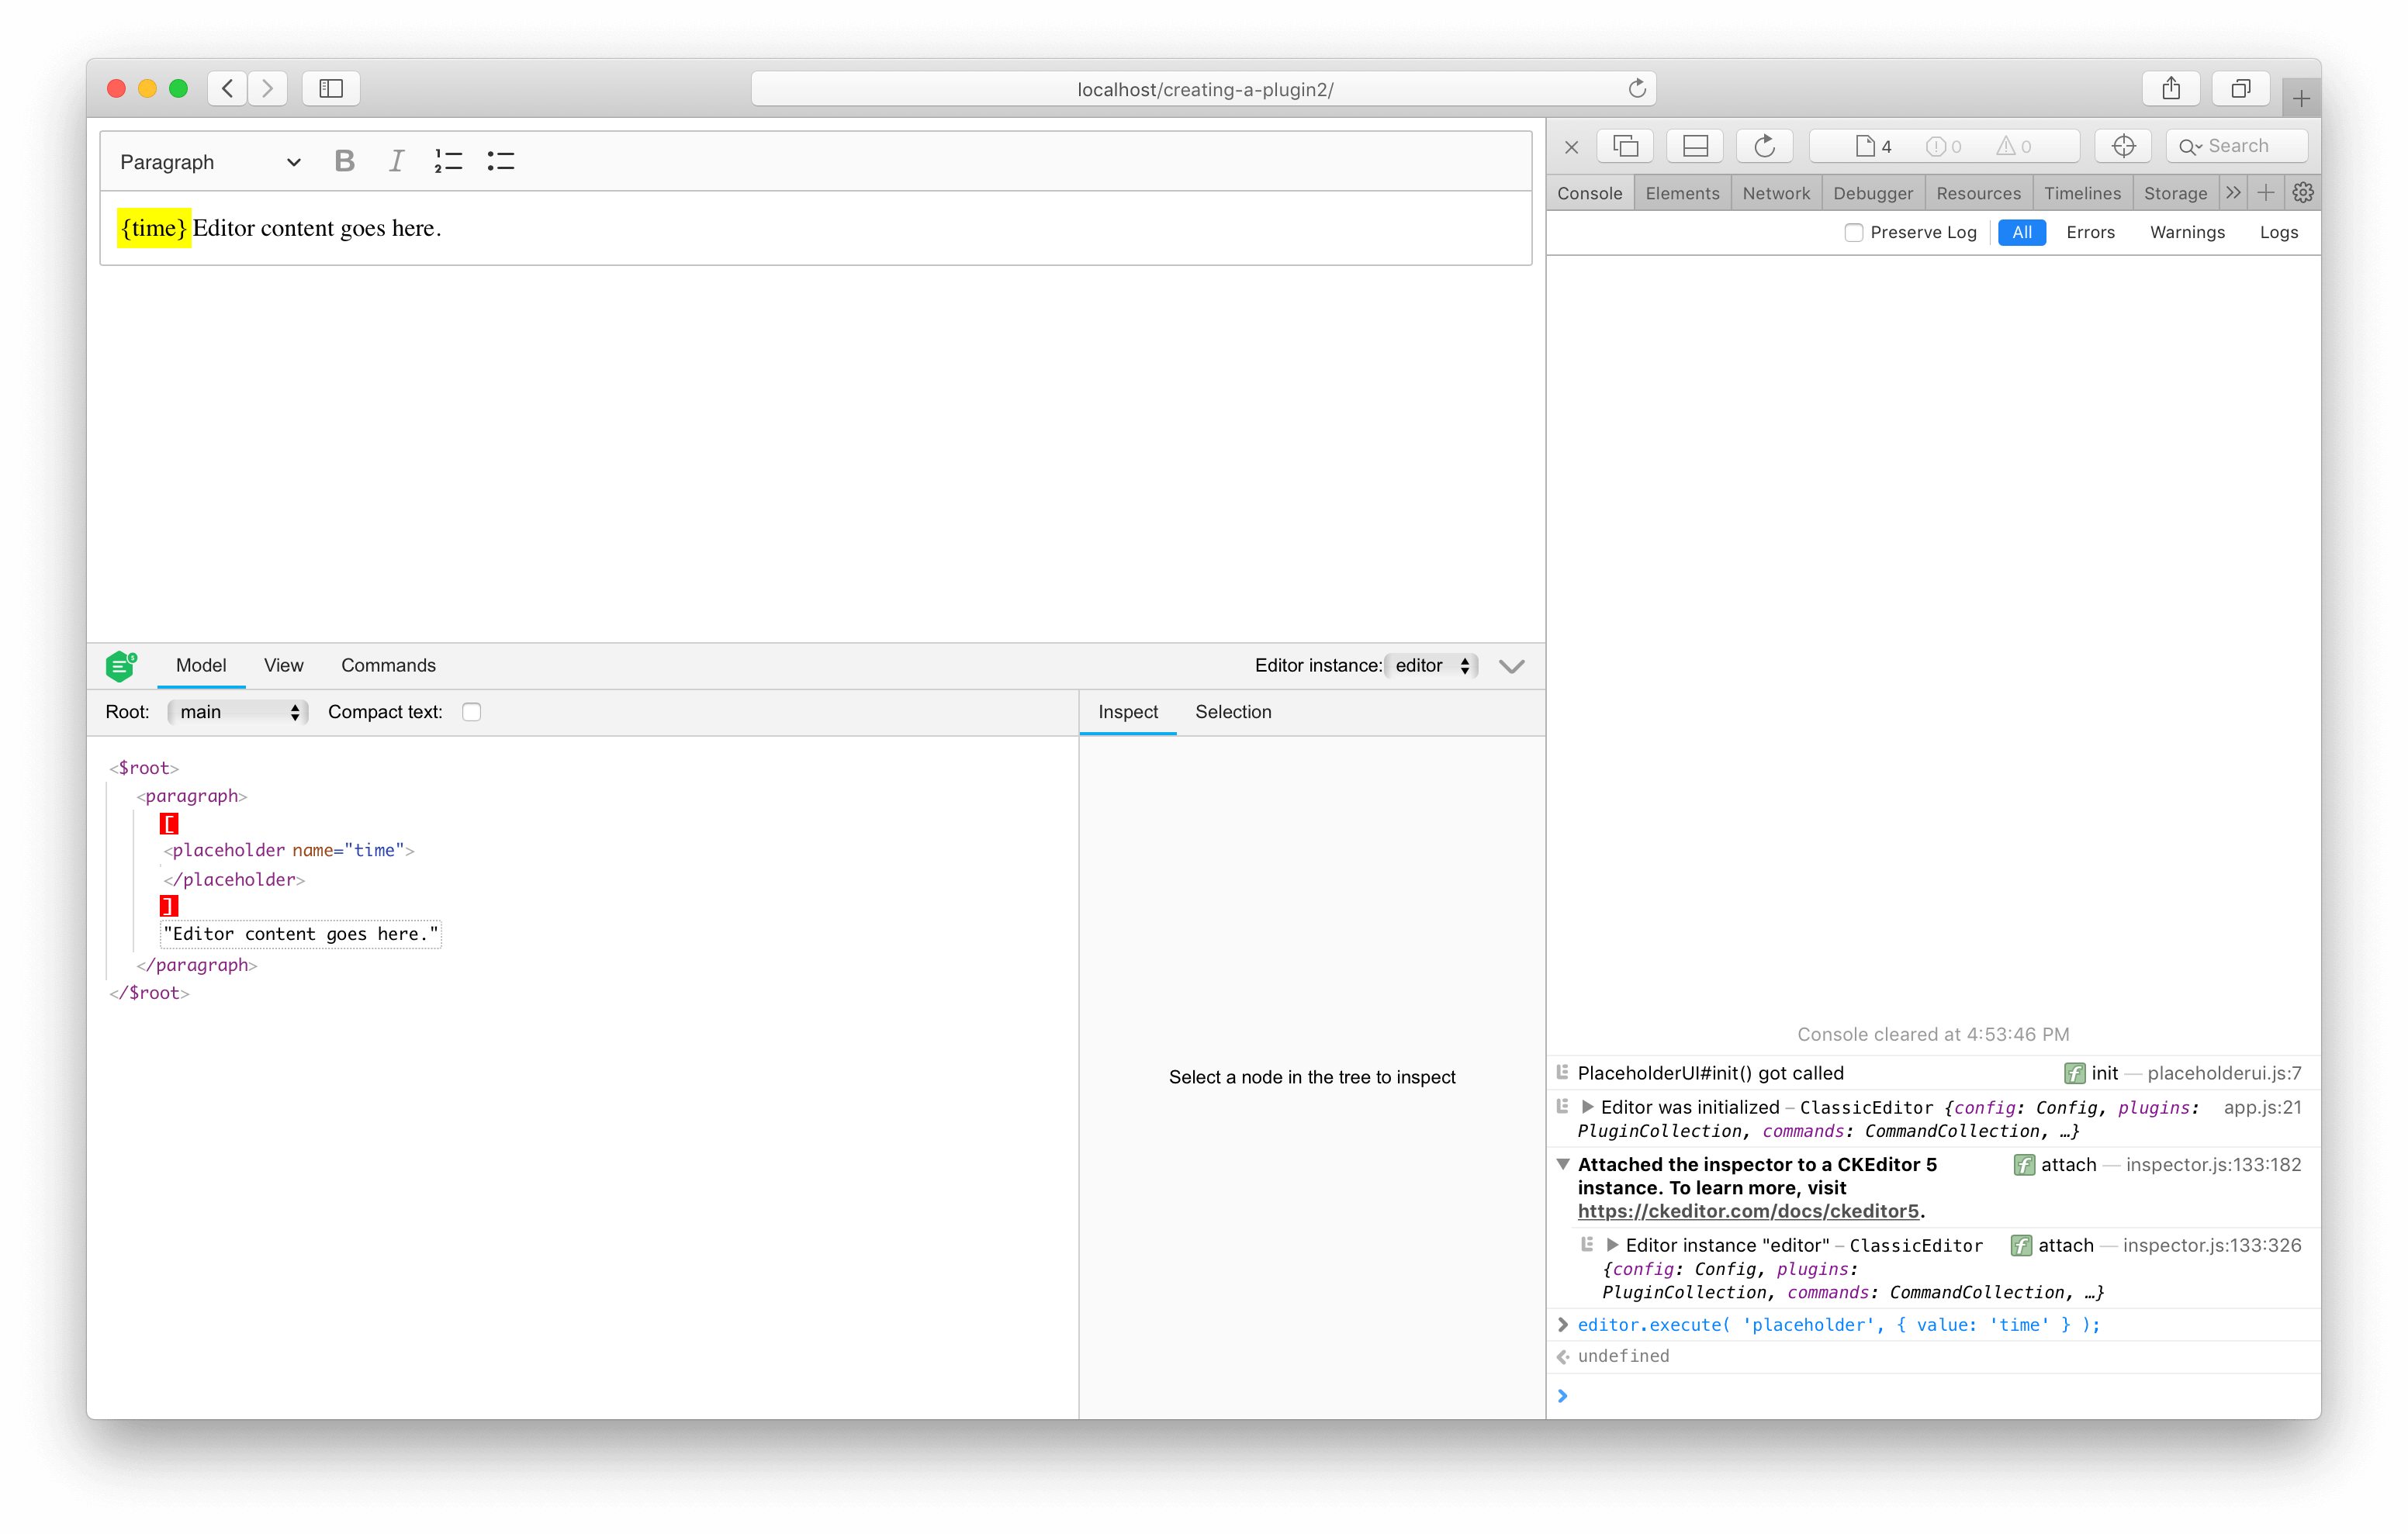
# 让我们看看它!
您应该能够执行placeholder命令来插入新的占位符
editor.execute( 'placeholder', { value: 'time' } );
这应该导致
# 修复位置映射
如果您更多地使用小部件(例如,尝试通过从其右侧到左侧边缘拖动鼠标来选择它),您将看到以下错误记录在控制台中
Uncaught CKEditorError: model-nodelist-offset-out-of-bounds: Given offset cannot be found in the node list.
此错误是由于模型和视图之间的文本节点映射存在差异,这是由于结构不同导致的
model:

foo<placeholder name="time"></placeholder>bar

view:

foo<span class="placeholder">{name}</span>bar
您可以说,在视图中,文本“更多”比在模型中。这意味着视图中的一些位置无法自动映射到模型中的位置。即 - 这些位置位于<span>元素内部。
幸运的是,CKEditor 5 允许自定义映射逻辑。此外,由于映射到空模型元素是一个非常常见的场景,因此有一个现成的实用程序viewToModelPositionOutsideModelElement(),您可以像这样在这里使用它
// placeholder/placeholderediting.js

import {
    Plugin,
    // MODIFIED
    Widget,
    toWidget,
    viewToModelPositionOutsideModelElement
} from 'ckeditor5';

import PlaceholderCommand from './placeholdercommand';
import './theme/placeholder.css';

export default class PlaceholderEditing extends Plugin {
    static get requires() {
        return [ Widget ];
    }

    init() {
        console.log( 'PlaceholderEditing#init() got called' );

        this._defineSchema();
        this._defineConverters();

        this.editor.commands.add( 'placeholder', new PlaceholderCommand( this.editor ) );

        // ADDED
        this.editor.editing.mapper.on(
            'viewToModelPosition',
            viewToModelPositionOutsideModelElement( this.editor.model, viewElement => viewElement.hasClass( 'placeholder' ) )
        );
    }

    _defineSchema() {
        // Previously registered schema.
        // ...
    }

    _defineConverters() {
        // Previously defined converters.
        // ...
    }
}
在添加自定义映射后,映射将完美地工作。视图<span>元素内部的每个位置都将映射到模型中<placeholder>外部的位置。
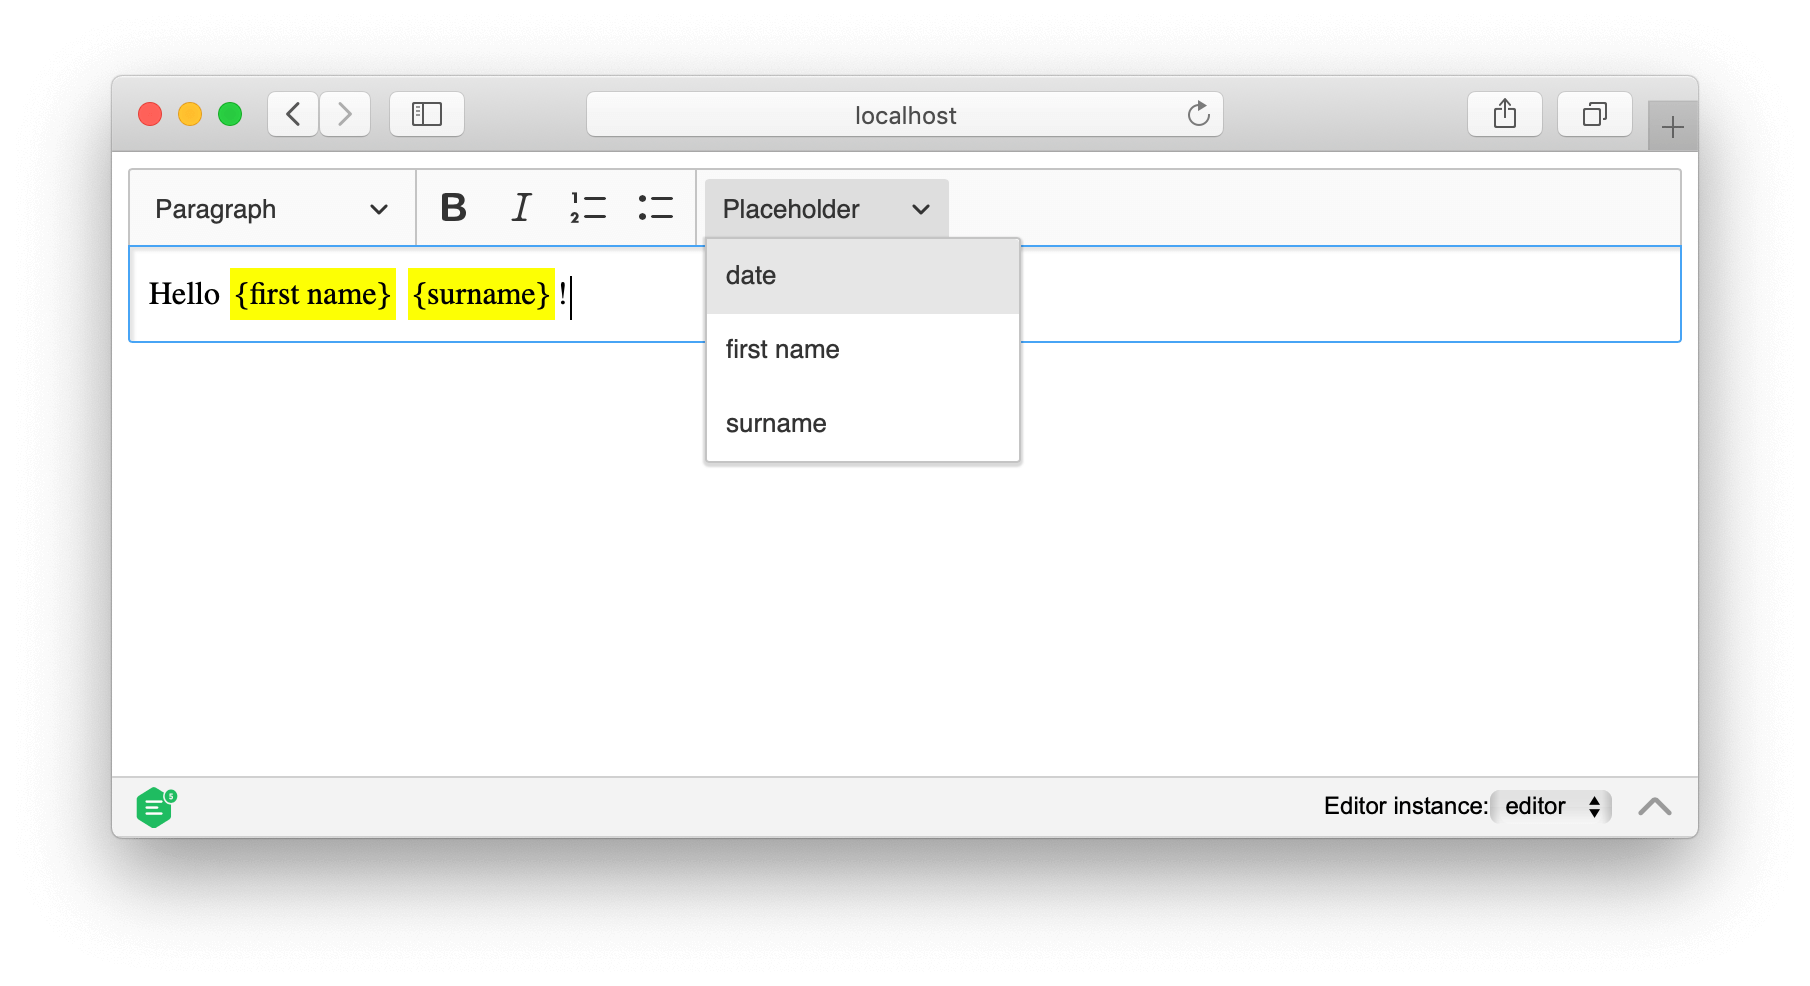
# 创建 UI
UI 部分将提供一个下拉按钮,用户可以从中选择一个占位符以插入到编辑器中。
CKEditor 5 框架包括用于创建不同下拉列表的帮助程序,例如工具栏或列表下拉列表。
在本教程中,您将创建一个包含可用占位符列表的下拉列表。
// placeholder/placeholderui.js

import {
    Plugin,
    ViewModel,
    addListToDropdown,
    createDropdown,
    Collection
} from 'ckeditor5';

export default class PlaceholderUI extends Plugin {
    init() {
        const editor = this.editor;
        const t = editor.t;
        const placeholderNames = [ 'date', 'first name', 'surname' ];

        // The "placeholder" dropdown must be registered among the UI components of the editor
        // to be displayed in the toolbar.
        editor.ui.componentFactory.add( 'placeholder', locale => {
            const dropdownView = createDropdown( locale );

            // Populate the list in the dropdown with items.
            addListToDropdown( dropdownView, getDropdownItemsDefinitions( placeholderNames ) );

            dropdownView.buttonView.set( {
                // The t() function helps localize the editor. All strings enclosed in t() can be
                // translated and change when the language of the editor changes.
                label: t( 'Placeholder' ),
                tooltip: true,
                withText: true
            } );

            // Disable the placeholder button when the command is disabled.
            const command = editor.commands.get( 'placeholder' );
            dropdownView.bind( 'isEnabled' ).to( command );

            // Execute the command when the dropdown item is clicked (executed).
            this.listenTo( dropdownView, 'execute', evt => {
                editor.execute( 'placeholder', { value: evt.source.commandParam } );
                editor.editing.view.focus();
            } );

            return dropdownView;
        } );
    }
}

function getDropdownItemsDefinitions( placeholderNames ) {
    const itemDefinitions = new Collection();

    for ( const name of placeholderNames ) {
        const definition = {
            type: 'button',
            model: new ViewModel( {
                commandParam: name,
                label: name,
                withText: true
            } )
        };

        // Add the item definition to the collection.
        itemDefinitions.add( definition );
    }

    return itemDefinitions;
}
将下拉列表添加到工具栏
// main.js

import Placeholder from './placeholder/placeholder';

ClassicEditor
    .create( document.querySelector( '#editor' ), {
        plugins: [ Essentials, Paragraph, Heading, List, Bold, Italic, Placeholder ],

        // Insert the "placeholder" dropdown into the editor toolbar.
        toolbar: [ 'heading', 'bold', 'italic', 'numberedList', 'bulletedList', '|', 'placeholder' ]
    } );
为了使此插件可扩展,占位符类型将从编辑器配置中读取。
第一步是在编辑插件中定义占位符配置
// Previously imported packages.
// ...

export default class PlaceholderEditing extends Plugin {
    static get requires() {
        return [ Widget ];
    }

    init() {
        console.log( 'PlaceholderEditing#init() got called' );

        this._defineSchema();
        this._defineConverters();

        this.editor.commands.add( 'placeholder', new PlaceholderCommand( this.editor ) );

        this.editor.editing.mapper.on(
            'viewToModelPosition',
            viewToModelPositionOutsideModelElement( this.editor.model, viewElement => viewElement.hasClass( 'placeholder' ) )
        );

        this.editor.config.define( 'placeholderConfig', {                           // ADDED
            types: [ 'date', 'first name', 'surname' ]
        } );
    }

    _defineConverters() {
        // Previously defined converters.
        // ...
    }

    _defineSchema() {
        // Previously registered schema.
        // ...
    }
}
现在修改 UI 插件,使其从配置中读取占位符类型
// placeholder/placeholderui.js

export default class PlaceholderUI extends Plugin {
    init() {
        const editor = this.editor;

        const placeholderNames = editor.config.get( 'placeholderConfig.types' );            // CHANGED

        editor.ui.componentFactory.add( 'placeholder', locale => {
            // Previously registered dropdown among UI components.
            // ...
        } );
    }
}
该插件现在已准备好接受配置。通过在编辑器的create()方法中添加placeholderConfig配置来检查它是如何工作的
// Previously imported packages.
// ...

ClassicEditor
    .create( document.querySelector( '#editor' ), {
        plugins: [ Essentials, Paragraph, Heading, List, Bold, Italic, Widget, Placeholder ],
        toolbar: [ 'heading', 'bold', 'italic', 'numberedList', 'bulletedList', '|', 'placeholder' ],
        placeholderConfig: {
            types: [ 'date', 'color', 'first name', 'surname' ]                             // ADDED
        }
    } )
    // Promise handling.
    // ...
如果您打开工具栏中的下拉列表,您将看到一个新的要插入的占位符列表。
# 演示
您可以在下面的编辑器中看到占位符小部件实现的实际效果。您还可以查看本教程的完整源代码,如果您想开发自己的内联小部件。
您好 {first name} {surname}!
# 最终解决方案
如果您在教程的任何步骤中迷路,或者想直接跳转到解决方案,有一个包含最终项目的存储库可用。
npx -y degit ckeditor/ckeditor5-tutorials-examples/inline-widget/final-project final-project
cd final-project

npm install
npm run dev
我们每天都在努力使我们的文档保持完整。您是否发现过时信息?是否有遗漏内容?请通过我们的问题跟踪器报告。
随着 42.0.0 版本的发布,我们重写了大部分文档以反映新的导入路径和功能。我们感谢您的反馈,帮助我们确保其准确性和完整性。