

 使用自定义 UI 获取用户输入
在本教程的这一部分中,我们将重点介绍创建对话框,该对话框将获取用户的输入。
我们将从第一部分结束的地方开始,所以请确保你从那里开始,或者获取我们的本部分的入门文件。
由于我们主要处理 UI,建议你在开始编码之前阅读有关我们UI 库的信息。
如果你想在深入了解之前查看本教程的最终产品,请查看实时演示。
# 创建视图
此插件 UI 中最重要的部分是带有表单的对话框,它将获取用户的输入。
# 创建表单视图模板
让我们从创建一个带有表单的视图开始。它将包括两个输入字段(用于缩写和标题),以及submit和cancel按钮。我们将在一个单独的视图中完成它。首先,我们在abbreviation/目录中创建一个新文件abbreviationview.js。
我们新的FormView类将扩展View类,所以让我们从 UI 库中导入它开始。
在FormView构造函数中,我们定义了缩写表单的模板。我们需要设置 HTML 元素的标签,以及它的几个属性。为了确保我们的视图是可聚焦的,让我们添加tabindex="-1"。
// abbreviation/abbreviationview.js

import View from '@ckeditor/ckeditor5-ui';

export default class FormView extends View {
    constructor( locale ) {
        super( locale );

        this.setTemplate( {
            tag: 'form',
            attributes: {
                class: [ 'ck', 'ck-abbr-form' ],
                tabindex: '-1'
            }
        } );
    }

}
请注意,我们添加了两个类。编辑器的所有 UI 元素都需要具有ck类(除非你想创建自己的 UI 而不使用 CKEditor 5 的内置库)。我们还为表单创建了一个新类,我们将在稍后用于对其进行样式设置。
# 创建输入字段
由于我们有两个相似的输入字段需要创建,而且我们不想重复自己,所以让我们定义一个_createInput()方法,它将为我们生成它们。它将接受输入字段的标签。
我们将使用LabeledFieldView类,并将createLabeledInputText()函数作为第二个参数传递给它。它是一个来自 CKEditor UI 库的助手,它将负责创建输入。
// abbreviation/abbreviationview.js

import {
    View,
    LabeledFieldView,				// ADDED
    createLabeledInputText			// ADDED
    } from '@ckeditor/ckeditor5-ui';

export default class FormView extends View {
    constructor( locale ) {

        this.abbrInputView = this._createInput( 'Add abbreviation' );
        this.titleInputView = this._createInput( 'Add title' );

        // Previously set template.
        // ...
    }

    _createInput( label ) {
        const labeledInput = new LabeledFieldView( this.locale, createLabeledInputText );

        labeledInput.label = label;

        return labeledInput;
    }
}
# 创建表单按钮
现在,我们将submit和cancel按钮添加到我们的表单中。你可以从 UI 库中导入ButtonView以及我们将用于标签的图标开始。
我们将使用核心包的图标库中的check和cancel图标。导入图标后,我们将使用它们来创建按钮。
让我们编写一个_createButton函数,它将接收三个参数 - label、icon和className。然后,我们使用之前传递给函数的属性设置按钮属性,并添加一个工具提示选项。
// abbreviation/abbreviationview.js

import {
    View,
    LabeledFieldView,
    createLabeledInputText,
    ButtonView										// ADDED
    } from '@ckeditor/ckeditor5-ui';
import { icons } from '@ckeditor/ckeditor5-core';	// ADDED

export default class FormView extends View {
    constructor( locale ) {
        // Previously created inputs.
        // ...

        // Create the save and cancel buttons.
        this.saveButtonView = this._createButton(
            'Save', icons.check, 'ck-button-save'
        );
        // Set the type to 'submit', which will trigger
        // the submit event on entire form when clicked.
        this.saveButtonView.type = 'submit';

        this.cancelButtonView = this._createButton(
            'Cancel', icons.cancel, 'ck-button-cancel'
        );

        // Previously set template.
        // ...
    }

    _createInput( label ) {
        // Input initialization.
        // ...
    }

    _createButton( label, icon, className ) {
        const button = new ButtonView();

        button.set( {
            label,
            icon,
            tooltip: true,
            class: className
        } );

        return button;
    }
}
当用户点击这些按钮之一时,我们希望提交或取消表单视图。这些事件应该从表单视图中触发,所以我们需要将它们从按钮委托给表单视图。
现在,我们将cancelButtonView#execute委托给 FormView,因此按下cancel按钮将触发FormView#cancel。我们将分几步处理提交事件的委托。
// abbreviation/abbreviationview.js

// Previously imported packages.
// ...

export default class FormView extends View {
    constructor( locale ) {
        // Previously created inputs.
        // ...

        this.saveButtonView = this._createButton(
            'Save', icons.check, 'ck-button-save'
        );
        this.saveButtonView.type = 'submit';
        this.cancelButtonView = this._createButton(
            'Cancel', icons.cancel, 'ck-button-cancel'
        );
        // Delegate ButtonView#execute to FormView#cancel.
        this.cancelButtonView.delegate( 'execute' ).to( this, 'cancel' );

        // Previously set template.
        // ...
    }

    _createInput( label ) {
        // Input initialization.
        // ...
    }

    _createButton( label, icon, className ) {
        // Button initialization.
        // ...
    }
}
# 添加样式
我们使用styles.css来为新 UI 元素添加样式。让我们为表单添加一些填充,并使用CSS 网格布局来很好地显示表单的所有四个元素。
我们将使用我们的设置间距变量来保持一致性。
/* style.css */

.ck.ck-abbr-form {
    padding: var(--ck-spacing-large);
    display: grid;
    grid-template-columns: repeat(2, 1fr);
    grid-template-rows: repeat(3, 1fr);
    grid-column-gap: 0px;
    grid-row-gap: var(--ck-spacing-standard);
}

.ck.ck-abbr-form .ck.ck-labeled-field-view:nth-of-type(1) {
    grid-area: 1 / 1 / 2 / 3;
}

.ck.ck-abbr-form .ck.ck-labeled-field-view:nth-of-type(2) {
    grid-area: 2 / 1 / 3 / 3;
}

.ck.ck-abbr-form .ck-button:nth-of-type(1) {
    grid-area: 3 / 1 / 4 / 2;
}

.ck.ck-abbr-form .ck-button:nth-of-type(2) {
    grid-area: 3 / 2 / 4 / 3;
}
将它导入AbbreviationUI
// abbreviation/abbreviationui.js

import Plugin from '@ckeditor/ckeditor5-core/src/plugin';
import ButtonView from '@ckeditor/ckeditor5-ui/src/button/buttonview';
import './styles.css';											// ADDED

export default class AbbreviationUI extends Plugin {
    // Definition of Abbreviation UI class.
    // ...
}
# 完成表单视图
我们差不多完成了表单视图,只需要添加几个收尾工作。
在constructor中,我们使用createCollection()方法创建了一个ViewCollection。我们将所有输入和按钮视图放入集合中,并使用它来更新FormView模板及其新创建的子元素。
让我们也为FormView添加render()方法。我们将在那里使用一个助手submitHandler()函数,它会拦截一个本机 DOM 提交事件,阻止默认的 Web 浏览器行为(导航和页面重新加载),并在视图上触发submit事件。
我们还需要一个focus()方法,它将在每次将表单添加到编辑器时,将焦点设置到abbreviation输入视图的第一个子元素上。这只是焦点跟踪在 CKEditor 5 中可以做的事情的示例。我们将在本教程的下一部分中进一步了解它。
// abbreviation/abbreviationview.js

import {
    View,
    LabeledFieldView,
    createLabeledInputText,
    ButtonView,
    submitHandler									// ADDED
    } from '@ckeditor/ckeditor5-ui';
import { icons } from '@ckeditor/ckeditor5-core';

export default class FormView extends View {
    constructor( locale ) {
        // Previously created elements.
        // ...

        this.childViews = this.createCollection( [
            this.abbrInputView,
            this.titleInputView,
            this.saveButtonView,
            this.cancelButtonView
        ] );

        this.setTemplate( {
            tag: 'form',
            attributes: {
                // Attributes of a form template.
                // ...
            },
            children: this.childViews				// ADDED
        } );
    }

    render() {
        super.render();

        // Submit the form when the user clicked the save button
        // or pressed enter in the input.
        submitHandler( {
            view: this
        } );
    }

    focus() {
        this.childViews.first.focus();
    }

    _createInput( label ) {
        // Input initialization.
        // ...
    }

    _createButton( label, icon, className ) {
        // Button initialization.
        // ...
    }
}
我们的FormView完成了!但是,我们还看不到它,所以让我们把它添加到AbbreviationUI类中。
# 添加上下文气球
我们的表单需要出现在气球中,我们将使用来自 CKEditor 5 UI 库的ContextualBalloon类来创建一个。
这就是我们在教程的第一部分中 UI 的最终状态。
// abbreviation/abbreviationui.js

import Plugin from '@ckeditor/ckeditor5-core/src/plugin';
import ButtonView from '@ckeditor/ckeditor5-ui/src/button/buttonview';

export default class AbbreviationUI extends Plugin {
    init() {
        const editor = this.editor;

        editor.ui.componentFactory.add( 'abbreviation', () => {
            const button = new ButtonView();

            button.label = 'Abbreviation';
            button.tooltip = true;
            button.withText = true;

            this.listenTo( button, 'execute', () => {
                const title = 'What You See Is What You Get';
                const abbr = 'WYSIWYG';

                editor.model.change( writer => {
                    editor.model.insertContent(
                        writer.createText( abbr ),
                        { 'abbreviation': title }
                    );

                } );
            } );

            return button;
        } );
    }
}
我们需要对其进行一些修改,并添加ContextualBalloon和FormView。我们需要确保在创建AbbreviationUI实例时需要 Contextual Balloon,所以我们将从这一点开始。
让我们编写一个基本的_createFormView()函数,只是为了创建一个FormView类的实例(我们将在稍后扩展它)。
我们还需要创建一个函数,它将从用户的选择中为我们提供气球的目标位置。我们需要将选定的视图范围转换为 DOM 范围。我们可以使用viewRangeToDom()方法来做到这一点。
最后,我们将气球和表单视图添加到init()方法中。
// abbreviation/abbreviationui.js

import Plugin from '@ckeditor/ckeditor5-core/src/plugin';
import ButtonView from '@ckeditor/ckeditor5-ui/src/button/buttonview';
import ContextualBalloon from '@ckeditor/ckeditor5-ui';				// ADDED
import FormView from './abbreviationview';							// ADDED

export default class AbbreviationUI extends Plugin {
    static get requires() {
        return [ ContextualBalloon ];
    }

    init() {
        const editor = this.editor;

        // Create the balloon and the form view.
        this._balloon = this.editor.plugins.get( ContextualBalloon );
        this.formView = this._createFormView();

        editor.ui.componentFactory.add( 'abbreviation', () => {
            // A component factory callback that creates a button.
            // ...
        } );
    }

    _createFormView() {
        const editor = this.editor;
        const formView = new FormView( editor.locale );

        return formView;
    }

    _getBalloonPositionData() {
        const view = this.editor.editing.view;
        const viewDocument = view.document;
        let target = null;

        // Set a target position by converting view selection range to DOM.
        target = () => view.domConverter.viewRangeToDom(
            viewDocument.selection.getFirstRange()
        );

        return {
            target
        };
    }
}
现在,我们可以更改用户点击工具栏按钮时发生的事情。我们将用用户定义的缩写替换插入的硬编码缩写。
让我们编写一个_showUI()方法,它将通过将表单视图添加到气球中并设置其位置来显示我们的 UI 元素。最后一件事情是将焦点设置到表单视图,以便用户可以立即在第一个输入字段中开始输入。
// abbreviation/abbreviationui.js

// Previously imported packages.
// ...

export default class AbbreviationUI extends Plugin {
    // More methods.
    // ...

    init() {
        // The balloon and the view initialization.
        // ...

        editor.ui.componentFactory.add( 'abbreviation', () => {
            // Button initialization.
            // ...

            // Show the UI on button click.
            this.listenTo( button, 'execute', () => {
                this._showUI();
            } );

            return button;
        } );
    }

    _createFormView() {
        // The form view initialization.
        // ...
    }

    _getBalloonPositionData() {
        // Getting position data for the balloon.
        // ...
    }

    _showUI() {
        this._balloon.add( {
            view: this.formView,
            position: this._getBalloonPositionData()
        } );

        this.formView.focus();
    }
}
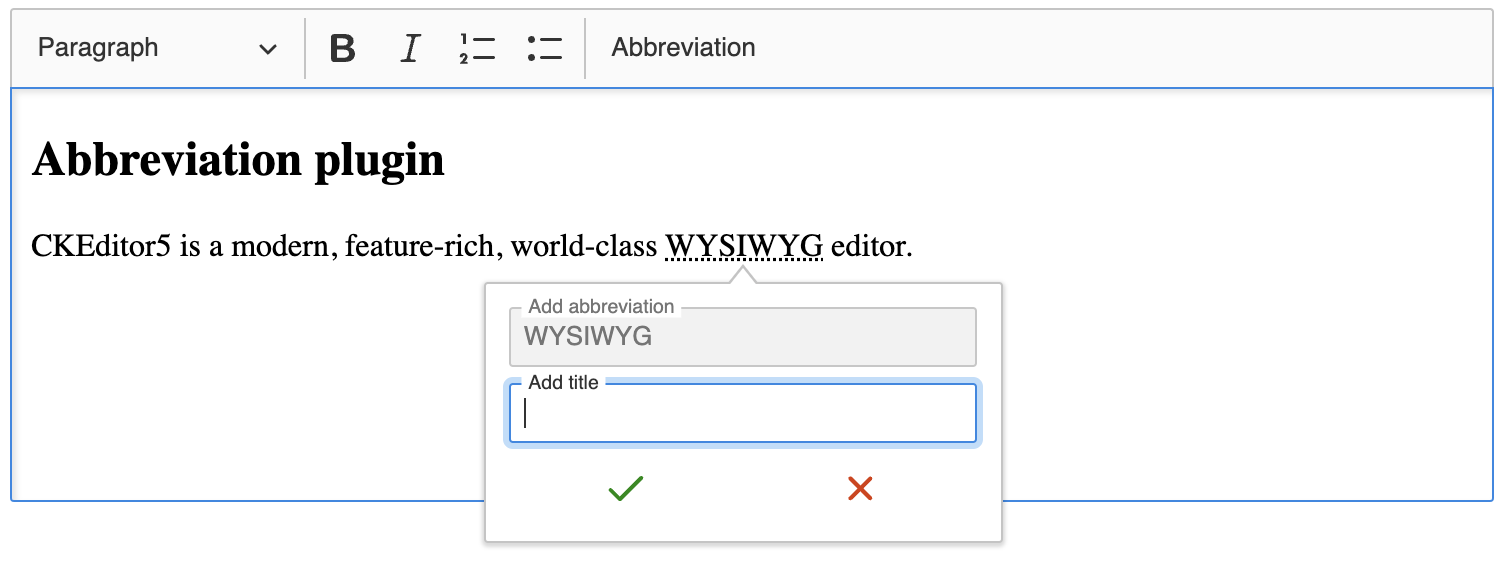
你现在应该可以看到你的气球和表单了!检查一下你的气球是否弹出来了(我们很快就会谈到隐藏它)。它应该看起来像这样
# 获取用户输入
现在是时候用用户输入替换硬编码的“WYSIWYG”缩写了。我们将从表单中获取值,并监听表单视图上的submit事件,我们是从保存按钮委托的(借助submitHandler)。
我们使用与教程第一部分工具栏按钮中相同的回调函数。我们只需要用来自输入视图的值替换“WYSIWYG”缩写。
// abbreviation/abbreviationui.js

// Previously imported packages.
// ...

export default class AbbreviationUI extends Plugin {
    static get requires() {
        return [ ContextualBalloon ];
    }

    init() {
        // The balloon and the view initialization.
        // ...
    }

    _createFormView() {
        const editor = this.editor;
        const formView = new FormView( editor.locale );

        this.listenTo( formView, 'submit', () => {
            const title = formView.titleInputView.fieldView.element.value;
            const abbr = formView.abbrInputView.fieldView.element.value;

            editor.model.change( writer => {
                editor.model.insertContent(
                    writer.createText( abbr, { abbreviation: title } )
                );
            } );

        } );

        return formView;
    }

    _getBalloonPositionData() {
        // Getting position data for the balloon.
        // ...
    }

    _showUI() {
        // Displaying balloon for the user.
        // ...
    }
}
我们的插件终于在做它应该做的事情了。最后一件事情是在我们不需要它时,从我们的编辑器中隐藏它。
# 隐藏表单视图
我们需要在以下三种情况下隐藏表单视图
- 用户提交表单后;
- 用户点击“取消”按钮时;
- 用户点击气球外部时。
我们将编写一个简单的_hideUI()函数,它将清除输入字段的值,并将视图从气球中移除。
此外,我们将导入 `clickOutsideHandler()` 方法,该方法将接收我们的 `_hideUI()` 函数作为回调。它将从我们的表单视图中发出,并在表单视图可见时激活。我们还需要为处理程序设置 `contextElements` 以确定其范围。点击其中列出的 HTML 元素不会触发回调。
// abbreviation/abbreviationui.js

// Previously imported packages.
// ...

import { ContextualBalloon, clickOutsideHandler } from '@ckeditor/ckeditor5-ui'; // ADDED

export default class AbbreviationUI extends Plugin {
    static get requires() {
        return [ ContextualBalloon ];
    }

    init() {
        // The balloon and the view initialization.
        // ...
    }

    _createFormView() {
        const editor = this.editor;
        const formView = new FormView( editor.locale );

        this.listenTo( formView, 'submit', () => {
            // Setting texts: title and abbreviation.
            // ...

            // Hide the form view after submit.
            this._hideUI();
        } );

        // Hide the form view after clicking the "Cancel" button.
        this.listenTo( formView, 'cancel', () => {
            this._hideUI();
        } );

        // Hide the form view when clicking outside the balloon.
        clickOutsideHandler( {
            emitter: formView,
            activator: () => this._balloon.visibleView === formView,
            contextElements: [ this._balloon.view.element ],
            callback: () => this._hideUI()
        } );

        return formView;
    }

    _hideUI() {
        this.formView.abbrInputView.fieldView.value = '';
        this.formView.titleInputView.fieldView.value = '';
        this.formView.element.reset();

        this._balloon.remove( this.formView );

        // Focus the editing view after closing the form view.
        this.editor.editing.view.focus();
    }

    _getBalloonPositionData() {
        // Getting position data for the balloon.
        // ...
    }

    _showUI() {
        // Displaying balloon for the user.
        // ...
    }
}
# 演示
缩写插件
CKEditor 5 是一款现代、功能丰富、世界一流的 WYSIWYG 编辑器。
# 最终代码
如果您在任何地方迷路了,这是 插件的最终实现。您可以将不同文件中的代码粘贴到您的项目中,或者克隆并安装整个项目,它将开箱即用。
接下来是什么?
本教程的第二部分就到这里了!我们拥有一个可用的 UI,并且我们的插件能够满足我们的需求。我们可以根据最佳实践对它进行改进,添加 命令、焦点跟踪等。我们将在 本教程的第三部分 中进行,所以请继续关注。
我们每天都在努力使我们的文档保持完整。您是否发现了过时的信息?有什么东西遗漏了吗?请通过我们的 问题追踪器 报告。