

 实用教程
实用教程
# 基础
# 如何设置 CKEditor 5 的高度?
编辑区域的高度可以使用 CSS 轻松控制。
/* This selector targets the editable element (excluding comments). */
.ck-editor__editable_inline:not(.ck-comment__input *) {
    height: 300px;
    overflow-y: auto;
}
# 如何自定义 CKEditor 5 的图标?
此方法仅适用于在 CKEditor 5 v42.0.0 中引入新安装方法之前默认使用的 webpack 设置。我们正在努力在当前默认方法中添加替换图标的功能。敬请期待!
最简单的方法是使用 webpack 的 NormalModuleReplacementPlugin 插件。例如,要替换粗体图标,请在您的 webpack.config.js 中使用以下代码
// ...
plugins: [
    new webpack.NormalModuleReplacementPlugin(
        /bold\.svg/,
        '/absolute/path/to/my/icon.svg'
    )
]
您也可以使用相对于导入 bold.svg 的资源(在本例中是 BoldUI 类文件)解析的相对路径。
了解有关 使用 webpack 构建 CKEditor 5 的更多信息。
# 如何在 DOM 中添加一个可编辑的编辑器属性?
如果您有编辑器实例的引用,请使用视图的 change() 方法,并通过 视图下行转换写入器 设置新的属性
editor.editing.view.change( writer => {
    const viewEditableRoot = editor.editing.view.document.getRoot();

    writer.setAttribute( 'myAttribute', 'value', viewEditableRoot );
} );
如果您没有编辑器实例的引用,但可以访问 DOM 中的可编辑元素,您可以 使用 ckeditorInstance 属性访问它,然后使用相同的 API 设置属性
const domEditableElement = document.querySelector( '.ck-editor__editable_inline' );
const editorInstance = domEditableElement.ckeditorInstance;

editorInstance.editing.view.change( writer => {
    // Map the editable element in the DOM to the editable element in the editor's view.
    const viewEditableRoot =
        editorInstance.editing.view.domConverter.mapDomToView(
            domEditableElement
        );

    writer.setAttribute( 'myAttribute', 'value', viewEditableRoot );
} );
# 如何检查 CKEditor 5 的版本?
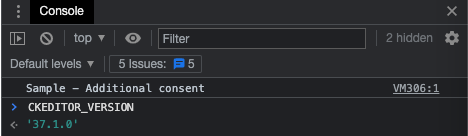
要检查您的编辑器版本,请打开浏览器开发工具中提供的 JavaScript 控制台。这通常通过浏览器的菜单完成,或者右键单击页面上的任何位置,然后从下拉菜单中选择“检查”选项。
输入 CKEDITOR_VERSION 命令以检查当前使用的 CKEditor 5 版本。
# 编辑器实例
# 如何在插件中获取编辑器实例?
在简单的插件中,您可以使用插件函数的属性获取编辑器的实例
function MyPlugin(editor) {
    // Interact with the API.
    // ...
}

ClassicEditor
    .create( document.querySelector( '#editor' ), {
        // If you're using builds, this is going to be extraPlugins property.
        plugins: [
            MyPlugin,
            // Other plugins.
            // ...
        ]
    } )
    .then( /* ... */ )
    .catch( /* ... */ );
# 如何从 DOM 元素获取编辑器实例对象?
如果您有编辑器可编辑 DOM 元素的引用(具有 .ck-editor__editable 类和 contenteditable 属性),您可以使用 ckeditorInstance 属性访问该可编辑元素所属的编辑器实例
<!-- The editable element in the editor's DOM structure. -->
<div class="... ck-editor__editable ..." contenteditable="true">
    <!-- Editable content. -->
</div>
// A reference to the editor editable element in the DOM.
const domEditableElement = document.querySelector( '.ck-editor__editable_inline' );

// Get the editor instance from the editable element.
const editorInstance = domEditableElement.ckeditorInstance;

// Use the editor instance API.
editorInstance.setData( '<p>Hello world!<p>' );
# 如何列出所有编辑器实例?
默认情况下,CKEditor 5 没有编辑器实例的全局注册表。但是,如果需要,可以轻松地实现此功能,如 此 Stack Overflow 答案 中所述。
# 编辑器的 API
# 如何将一些内容插入编辑器?
因为 CKEditor 5 使用自定义的 数据模型,所以无论何时想要插入任何内容,都应该先修改模型,然后将其转换回用户输入其内容的视图(称为“可编辑”。在 CKEditor 5 中,HTML 只是众多可能的输出格式之一。您可以了解有关更改模型的更多信息,请参阅 专用指南。
例如,要将新的链接插入当前位置,请使用以下代码段
editor.model.change( writer => {
    const insertPosition = editor.model.document.selection.getFirstPosition();

    const myLink = writer.createText(
        'CKEditor 5 rocks!',
        { linkHref: 'https://ckeditor.npmjs.net.cn/' }
    );

    editor.model.insertContent( myLink, insertPosition )
} );
要插入一些纯文本,您可以使用更短的代码段
editor.model.change( writer => {
    const insertPosition = editor.model.document.selection.getFirstPosition();

    editor.model.insertContent( writer.createText( 'Plain text' ), insertPosition );
} );
您可能已经注意到,链接在编辑器模型中表示为带有属性的文本。查看 模型写入器 的 API,了解其他有助于您修改编辑器模型的有用方法。 model.insertContent 将确保可以根据模式将内容插入选定的位置。
要插入一些更长的 HTML 代码,可以先将其解析为 模型片段,然后将其 插入 编辑器模型
const content =
    '<p>A paragraph with <a href="https://ckeditor.npmjs.net.cn">some link</a>.</p>';
const viewFragment = editor.data.processor.toView( content );
const modelFragment = editor.data.toModel( viewFragment );

editor.model.insertContent( modelFragment );
请记住,如果某个元素或属性没有声明转换器(无论是由专用功能还是 通用 HTML 支持 插件),则这些元素或属性将不会插入。
# 如何使编辑器获得焦点?
// Focus the editor.
editor.focus();
# 如何删除选定的块?
const selectedBlocks = Array.from(
    editor.model.document.selection.getSelectedBlocks()
);
const firstBlock = selectedBlocks[ 0 ];
const lastBlock = selectedBlocks[ selectedBlocks.length - 1 ];

editor.model.change( writer => {
    const range = writer.createRange(
        writer.createPositionAt( firstBlock, 0 ),
        writer.createPositionAt( lastBlock, 'end' )
    );

    const selection = writer.createSelection( range )

    editor.model.deleteContent( selection );
} );
# 如何删除编辑器中的所有特定元素(例如块图像)?
editor.model.change( writer => {
    const range = writer.createRangeIn( editor.model.document.getRoot() );
    const itemsToRemove = [];

    for ( const value of range.getWalker() ) {
        if ( value.item.is( 'element', 'imageBlock' ) ) {
            // A different `is` usage.
            itemsToRemove.push( value.item );
        }
    }

    for ( const item of itemsToRemove ) {
        writer.remove( item ); // Remove all the items.
    }
} );
# 如何将光标放在开头或结尾?
// Place it at the beginning.
editor.model.change( writer => {
    writer.setSelection(
        writer.createPositionAt( editor.model.document.getRoot(), 0 )
    );
} );

// Place it at the end.
editor.model.change( writer => {
    writer.setSelection(
        writer.createPositionAt( editor.model.document.getRoot(), 'end' )
    );
} );
# 如何查找编辑器中的所有特定元素?
在下面的示例中,我们尝试找到所有链接,并存储唯一的链接。
const range = editor.model.createRangeIn( editor.model.document.getRoot() );

const links = new Set();

for ( const value of range.getWalker() ) {
    // Link is an attribute on a Text element.
    if ( value.type === 'text' && value.item.hasAttribute( 'linkHref' ) ) {
        // Set will store only unique links, preventing duplication.
        links.add( value.item.getAttribute( 'linkHref' ) );
    }
}
# 如何在文档中查找单词,并获取它们的范围?
如果您需要搜索文本片段并将其重新映射到其模型位置,请使用以下示例。它将找到文档根目录中可用的所有单词,基于这些单词创建模型范围,并将它们输入控制台。
const model = editor.model;
const rootElement = model.document.getRoot();
const rootRange = model.createRangeIn( rootElement );
const wordRanges = [];

for ( const item of rootRange.getItems() ) {
    // Find `$block` elements (those accept text).
    if ( item.is( 'element' ) && model.schema.checkChild( item, '$text' ) ) {
        // Get the whole text from block.
        // Inline elements (like softBreak or imageInline) are replaced
        // with a single whitespace to keep the position offset correct.
        const blockText = Array.from( item.getChildren() )
            .reduce( ( rangeText, item ) => rangeText + ( item.is( '$text' ) ? item.data : ' ' ), '' );

        // Find all words.
        for ( const match of blockText.matchAll( /\b\S+\b/g ) ) {
            // The position in a text node is always parented by the block element.
            const startPosition = model.createPositionAt( item, match.index );
            const endPosition = model.createPositionAt( item, match.index + match[ 0 ].length );

            wordRanges.push( model.createRange( startPosition, endPosition ) );
        }
    }
}

// Example usage of the collected words:
for ( const range of wordRanges ) {
    const fragment = model.getSelectedContent( model.createSelection( range ) );
    const html = editor.data.stringify( fragment );

    console.log( `[${ range.start.path }] - [${ range.end.path }]`, html );
}
# 如何监听双击(例如,链接元素)?
// Add observer for double click and extend a generic DomEventObserver class by a native DOM dblclick event:
import { DomEventObserver } from 'ckeditor5';

class DoubleClickObserver extends DomEventObserver {
    constructor( view ) {
        super( view );

        this.domEventType = 'dblclick';
    }

    onDomEvent( domEvent ) {
        this.fire( domEvent.type, domEvent );
    }
}

// Then use in the editor:
const view = editor.editing.view;
const viewDocument = view.document;

view.addObserver( DoubleClickObserver );

editor.listenTo(
    viewDocument,
    'dblclick',
    ( evt, data ) => {
        console.log( 'clicked' );
        // Fire your custom actions here.
    },
    { context: 'a' }
);
我们的功能提供了许多观察者,您应该检查是否没有已经针对给定 DOM 事件触发的冲突观察者。
# 如何创建一个具有单个视图元素和多个/嵌套模型元素的小部件?
import { Plugin, toWidget, toWidgetEditable } from 'ckeditor5'

class Forms extends Plugin {
    init() {
        const editor = this.editor;
        const schema = editor.model.schema;

        schema.register( 'forms', {
            inheritAllFrom: '$inlineObject',
            allowAttributes: 'type'
        } );

        schema.register( 'formName', {
            allowIn: 'forms',
            allowChildren: '$text',
            isLimit: true
        } );

        // Disallow all attributes on $text inside `formName` (there won't be any bold/italic etc. inside).
        schema.addAttributeCheck( context => {
            if ( context.endsWith( 'formName $text' ) ) {
                return false;
            }
        } );

        // Allow only text nodes inside `formName` (without any elements that could be down-casted to HTML elements).
        schema.addChildCheck( ( context, childDefinition ) => {
            if (
                context.endsWith( 'formName' ) &&
                childDefinition.name !== '$text'
            ) {
                return false;
            }
        } );

        // Data upcast. Convert a single element loaded by the editor to a structure of model elements.
        editor.conversion.for( 'upcast' ).elementToElement( {
            view: {
                name: 'input',
                attributes: [ 'type', 'name' ]
            },
            model: ( viewElement, { writer } ) => {
                const modelElement = writer.createElement( 'forms', {
                    type: viewElement.getAttribute( 'type' )
                } );
                const nameModelElement = writer.createElement( 'formName' );

                // Build model structure out of a single view element.
                writer.insert( nameModelElement, modelElement, 0 );
                writer.insertText(
                    viewElement.getAttribute( 'name' ),
                    nameModelElement,
                    0
                );

                return modelElement;
            }
        } );

        // Editing downcast. Convert model elements separately to widget and to widget-editable nested inside.
        editor.conversion
            .for( 'editingDowncast' )
            .elementToElement( {
                model: 'forms',
                view: ( modelElement, { writer } ) => {
                    const viewElement = writer.createContainerElement( 'span', {
                        'data-type': modelElement.getAttribute( 'type' ),
                        style: 'display: inline-block'
                    } );

                    return toWidget( viewElement, writer );
                }
            } )
            .elementToElement( {
                model: 'formName',
                view: ( modelElement, { writer } ) => {
                    const viewElement = writer.createEditableElement( 'span' );

                    return toWidgetEditable( viewElement, writer );
                }
            } );

        // Data downcast. Convert the outermost model element and all its content into a single view element.
        editor.conversion.for( 'dataDowncast' ).elementToElement( {
            model: 'forms',
            view: ( modelElement, { writer, consumable } ) => {
                let nameModelElement;

                // Find the `formName` model element and consume everything inside the model element range,
                // so it won't get converted by any other downcast converters.
                for ( const { item } of editor.model.createRangeIn( modelElement ) ) {
                    if ( item.is( 'element', 'formName' ) ) {
                        nameModelElement = modelElement.getChild( 0 );
                    }

                    consumable.consume( item, 'insert' );
                }

                return writer.createContainerElement( 'input', {
                    type: modelElement.getAttribute( 'type' ),
                    name: nameModelElement.getChild( 0 ).data
                } );
            }
        } );
    }
}
# 如何向链接对话框添加自定义按钮?
import { ButtonView, Plugin, LinkUI } from 'ckeditor5';

class InternalLink extends Plugin {
    init() {
        const editor = this.editor;
        const linkUI = editor.plugins.get( LinkUI );
        const contextualBalloonPlugin = editor.plugins.get( 'ContextualBalloon' );

        this.listenTo( contextualBalloonPlugin, 'change:visibleView', ( evt, name, visibleView ) => {
            if ( visibleView === linkUI.formView ) {
                // Detach the listener.
                this.stopListening( contextualBalloonPlugin, 'change:visibleView' );

                this.linkFormView = linkUI.formView;
                this.button = this._createButton();

                console.log( 'The link form view has been displayed', this.linkFormView );

                // Render the button template.
                this.button.render();

                // Register the button under the link form view, it will handle its destruction.
                this.linkFormView.registerChild( this.button );

                // Inject the element into DOM.
                this.linkFormView.element.insertBefore( this.button.element, this.linkFormView.saveButtonView.element );
            }
        } );
    }

    _createButton() {
        const editor = this.editor;
        const button = new ButtonView( this.locale );
        const linkCommand = editor.commands.get( 'link' );

        button.set( {
            label: 'Internal link',
            withText: true,
            tooltip: true
        } );

        // This button should be also disabled when the link command is disabled.
        // Try setting editor.isReadOnly = true to see it in action.
        button.bind( 'isEnabled' ).to( linkCommand );

        button.on( 'execute', () => {
            // Do something (for emaple, open the popup), then update the link URL field's value.
            // The line below will be executed inside some callback.
            this.linkFormView.urlInputView.value = 'http://some.internal.link';
        } );

        return button;
    }
}
# 框架集成
# JavaScript 堆内存不足 错误
使用 yarn build 命令构建 React 应用程序以进行生产时,它可能很小概率地产生与构建机器上可用内存相关的错误
<--- Last few GCs --->

[32550:0x110008000]    42721 ms: Scavenge (reduce) 4061.0 (4069.6) -> 4060.5 (4070.8) MB, 4.3 / 0.0 ms  (average mu = 0.358, current mu = 0.374) allocation failure
[32550:0x110008000]    42726 ms: Scavenge (reduce) 4061.2 (4069.8) -> 4060.6 (4071.3) MB, 4.0 / 0.0 ms  (average mu = 0.358, current mu = 0.374) allocation failure
[32550:0x110008000]    42730 ms: Scavenge (reduce) 4061.4 (4073.3) -> 4060.9 (4073.3) MB, 3.7 / 0.0 ms  (average mu = 0.358, current mu = 0.374) allocation failure

<--- JS stacktrace --->

FATAL ERROR: Ineffective mark-compacts near heap limit Allocation failed - JavaScript heap out of memory
 1: 0x1012e4da5 node::Abort() (.cold.1) [/usr/local/bin/node]
此问题尚未解决,但是有一个解决方法。使用 --max_old_space_size 修饰符增加 Node.js 的可用内存应该可以解决问题。
node --max_old_space_size=4096 node_modules/.bin/react-scripts build
内存限制也可以全局设置。
# Save it in the `.bash_profile` file to avoid typing it after rebooting the machine.
export NODE_OPTIONS="--max-old-space-size=4096"

yarn build
它也可以按需设置,在每次命令调用时。
NODE_OPTIONS="--max-old-space-size=4096" yarn build
我们每天都在努力使我们的文档保持完整。您发现过时信息了吗?缺少什么内容吗?请通过我们的 问题跟踪器 报告。
随着 42.0.0 版本的发布,我们重新编写了大部分文档以反映新的导入路径和功能。感谢您的反馈,帮助我们确保文档的准确性和完整性。