

 定义模型和视图
本指南将向您展示如何为 CKEditor 5 创建一个简单的缩写插件。
我们将创建一个工具栏按钮,让用户可以在文档中插入缩写。这些缩写将使用 <abbr> HTML 元素,并带有一个“title”属性,当用户将鼠标悬停在该元素上时,该属性将在工具提示中显示。您可以查看前一句中带下划线的“HTML”文本悬停的机制。
本教程的第一部分将涵盖基础知识。我们只插入一个可能的缩写:“WYSIWYG”。我们将在本教程系列的下一部分中获取用户输入。
如果您想在深入了解之前查看本教程的最终产品,请查看实时演示。
# 让我们开始吧!
最简单的入门方法是使用以下命令获取入门项目。
npx -y degit ckeditor/ckeditor5-tutorials-examples/abbreviation-plugin/starter-files abbreviation-plugin
cd abbreviation-plugin

npm install
npm run dev
这将创建一个名为abbreviation-plugin的新目录,其中包含必要的文件。npm install命令将安装所有依赖项,而npm run dev将启动开发服务器。
main.js文件中创建了一个具有基本插件的编辑器。
入门文件附带了CKEditor 5 检查器连接到编辑器,因此您可以调试和观察模型和视图层中发生的情况。它将为您提供有关编辑器状态的大量有用信息,例如内部数据结构、选择、命令等等。
# 插件结构
我们的缩写插件分为三个组件——Abbreviation、AbbreviationUI和AbbreviationEditing。
Abbreviation将是将 UI 和编辑粘合在一起的胶水。AbbreviationUI将负责 UI——工具栏按钮。AbbreviationEditing将启用模型中的缩写属性并引入适当的模型 ←→ 视图转换。
我们将它们放在/abbreviation目录中。我们将在本教程的下一部分中添加更多文件。这是迄今为止我们的目录结构
├── main.js
├── index.html
├── package.json
├── abbreviation
│   ├── abbreviation.js
│   ├── abbreviationediting.js
│   └── abbreviationui.js
查看 3 个组件,这些组件已经定义并导入到main.js中。
AbbreviationUI:
// abbreviation/abbreviationui.js

import { Plugin } from 'ckeditor5';

export default class AbbreviationUI extends Plugin {
    init() {
        console.log( 'AbbreviationUI#init() got called' );
    }
}
AbbreviationEditing:
// abbreviation/abbreviationediting.js

import { Plugin } from 'ckeditor5';

export default class AbbreviationEditing extends Plugin {
    init() {
        console.log( 'AbbreviationEditing#init() got called' );
    }
}
Abbreviation:
// abbreviation/abbreviation.js

import AbbreviationEditing from './abbreviationediting';
import AbbreviationUI from './abbreviationui';
import { Plugin } from 'ckeditor5';

export default class Abbreviation extends Plugin {
    static get requires() {
        return [ AbbreviationEditing, AbbreviationUI ];
    }
}
现在,我们需要在main.js文件中加载Abbreviation插件。编辑器将自行加载AbbreviationUI和AbbreviationEditing组件,因为它们是我们的“胶水”插件所需的。
// main.js

import Abbreviation from './abbreviation/abbreviation';					// ADDED

ClassicEditor
    .create( document.querySelector( '#editor' ), {
        plugins: [
            Essentials, Paragraph, Heading, List, Bold, Italic,
            Abbreviation												// ADDED
        ],
        toolbar: [ 'heading', 'bold', 'italic', 'numberedList', 'bulletedList' ]
    } );
您应该会看到AbbreviationEditing和AbbreviationUI插件已加载。
# 模型和视图层
CKEditor 5 实现了它自己的自定义数据模型,它与 DOM 不一一对应。模型文档被转换为视图,视图表示用户正在编辑的内容。
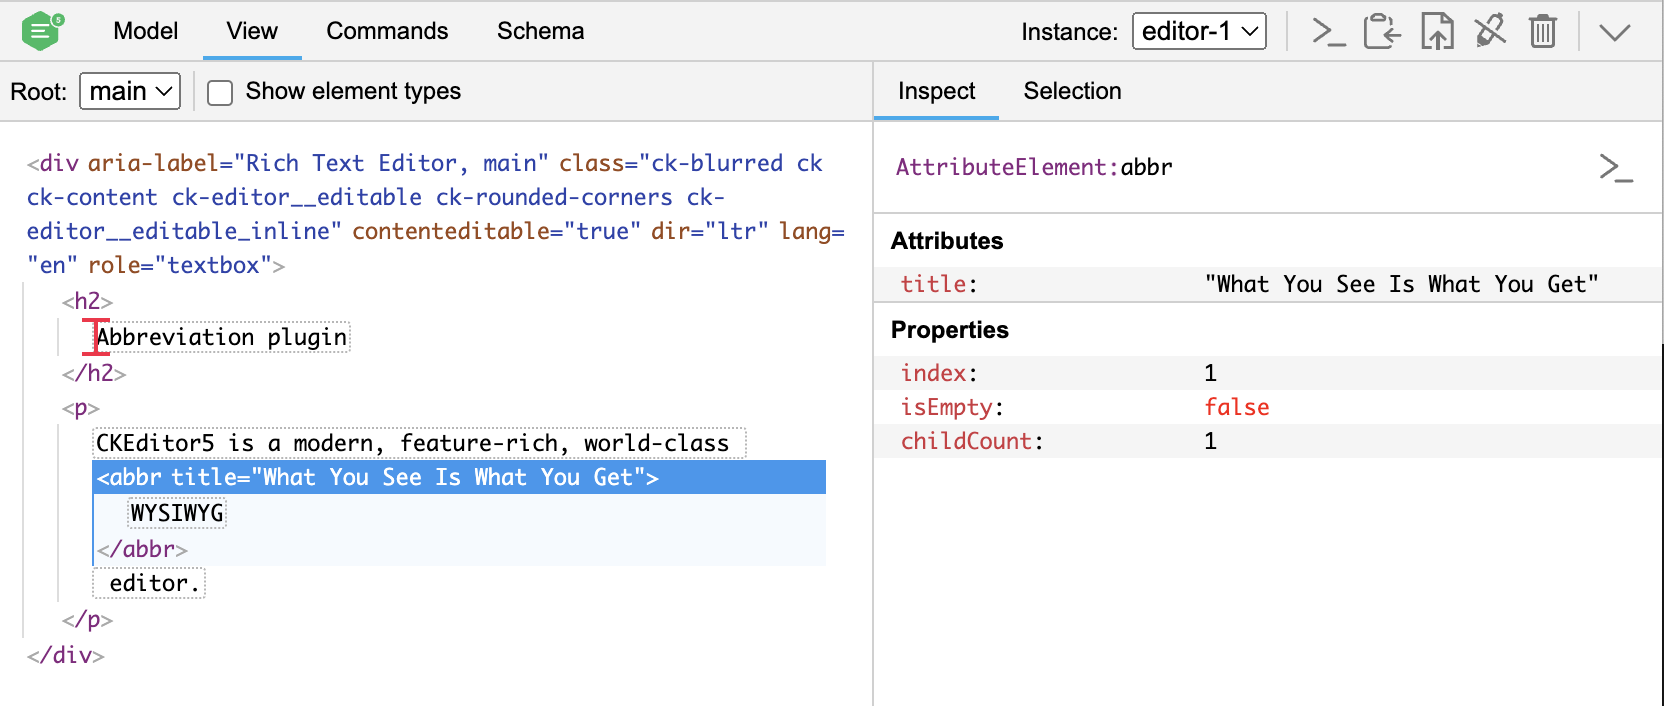
在视图层中,我们将拥有<abbr> HTML 元素,以及 title 属性。请查看它在检查器中的样子。
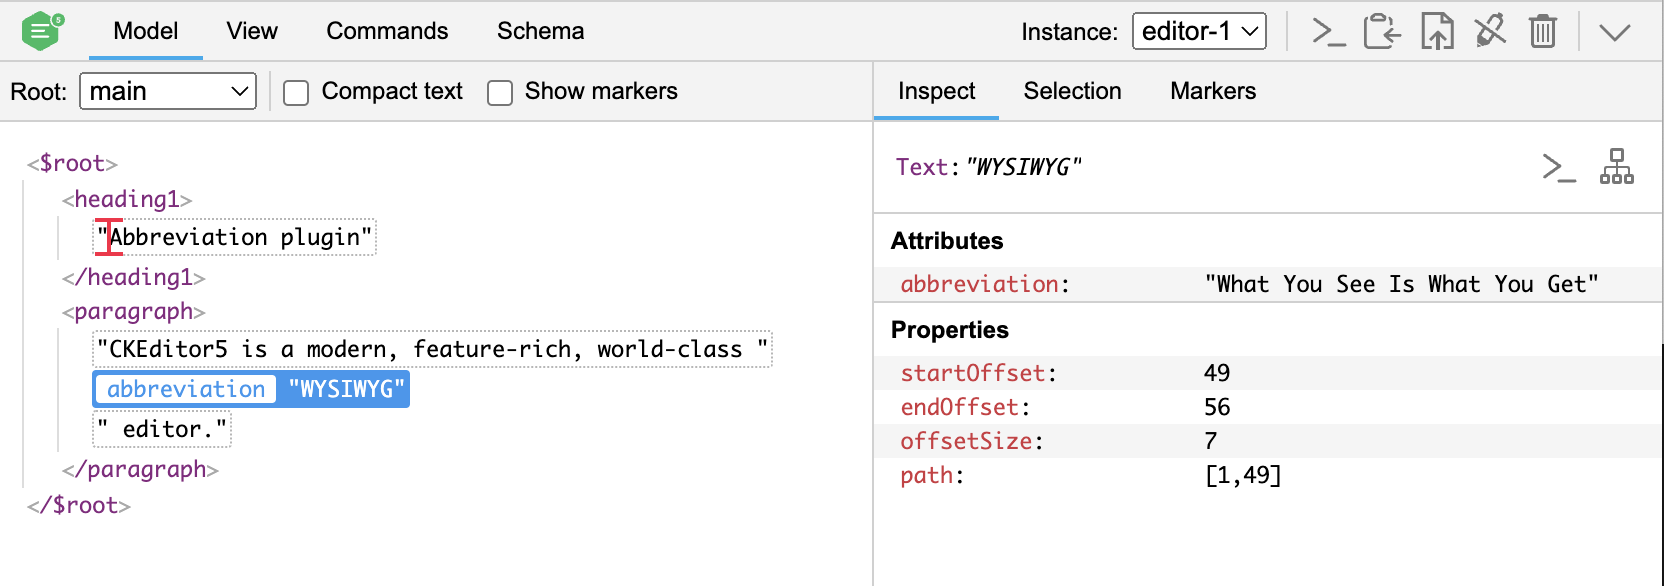
在模型中,像<abbr>这样的内联元素被表示为属性,而不是单独的元素。为了使我们的插件工作,我们需要确保可以将缩写属性添加到文本节点。
# 定义模式
我们可以通过定义模型的模式来做到这一点。只需几行代码,我们就可以允许所有文本节点接收模型缩写属性。
模式定义了模型中允许的结构、属性和其他特征。然后,功能和引擎会使用此信息来决定如何处理模型,因此您的自定义插件必须有一个定义良好的模式至关重要。在我们的编辑引擎架构简介中了解更多信息。
我们将简单地扩展文本节点的模式以使用schema.extend()方法接受我们的缩写属性。
使用此定义更新AbbreviationEditing插件
// abbreviation/abbreviationediting.js

import { Plugin } from 'ckeditor5';

export default class AbbreviationEditing extends Plugin {
    init() {
        this._defineSchema();									// ADDED
    }

    _defineSchema() {											// ADDED
        const schema = this.editor.model.schema;

        // Extend the text node's schema to accept the abbreviation attribute.
        schema.extend( '$text', {
            allowAttributes: [ 'abbreviation' ]
        } );
    }
}
# 定义转换器
转换器告诉编辑器如何将视图转换为模型(例如,在将数据加载到编辑器或处理粘贴的内容时),以及如何将模型渲染到视图(用于编辑目的或在检索编辑器数据时)。
转换是我们编辑引擎架构中更复杂的话题之一。在继续之前,绝对值得阅读有关编辑器中的转换的更多信息。
我们需要将模型缩写属性转换为视图元素(向下转换),反之亦然(向上转换)。我们可以通过使用我们的转换助手并定义模型和视图在两种转换中应该是什么样子来实现这一点。
转换缩写的完整标题有点棘手,因为我们需要确保其值在模型和视图之间同步。
# 向下转换
在向下转换中,我们将使用我们的转换助手之一——attributeToElement()——将模型缩写属性转换为视图<abbr>元素。
我们需要使用回调函数来获取存储为模型属性值的标题,并将其转换为视图元素的标题值。这里,视图回调的第二个参数是DowncastConversionApi对象。我们将使用它的writer属性,它将允许我们在向下转换过程中操作数据,因为它包含DowncastWriter的实例。
// abbreviation/abbreviationediting.js

import { Plugin } from 'ckeditor5';

export default class AbbreviationEditing extends Plugin {
    init() {
        this._defineSchema();
        this._defineConverters();							// ADDED
    }

    _defineSchema() {
        // Previously defined schema.
        // ...
    }

    _defineConverters() {									// ADDED
        const conversion = this.editor.conversion;

        // Conversion from a model attribute to a view element.
        conversion.for( 'downcast' ).attributeToElement( {
            model: 'abbreviation',
            // Callback function provides access to the model attribute value
            // and the DowncastWriter.
            view: ( modelAttributeValue, conversionApi ) => {
                const { writer } = conversionApi;

                return writer.createAttributeElement( 'abbr', {
                    title: modelAttributeValue
                } );
            }
        } );

    }
}
# 向上转换
向上转换告诉编辑器视图<abbr>元素在模型中应该是什么样子。我们将使用另一个转换助手——elementToAttribute()——对其进行转换。
我们还需要从内容中获取标题值并在模型中使用它。我们可以通过回调函数来做到这一点,它让我们可以访问视图元素。
// abbreviation/abbreviationediting.js

import { Plugin } from 'ckeditor5';

export default class AbbreviationEditing extends Plugin {
    init() {
        // Schema and converters initialization.
        // ...
    }

    _defineSchema() {
        // Previously defined schema.
        // ...
    }

    _defineConverters() {
        const conversion = this.editor.conversion;

        conversion.for( 'downcast' ).attributeToElement(
            // Code responsible for downcast conversion.
            // ...
        );

        // Conversion from a view element to a model attribute.
        conversion.for( 'upcast' ).elementToAttribute( {
            view: {
                name: 'abbr',
                attributes: [ 'title' ]
            },
            model: {
                key: 'abbreviation',
                // Callback function provides access to the view element.
                value: viewElement => {
                    const title = viewElement.getAttribute( 'title' );

                    return title;
                }
            }
        } );
    }
}
由于向上转换,我们在index.html中添加的缩写现在应该可以正常工作了。在开发服务器刷新后,应该可以看到更改。
# 创建工具栏按钮
现在我们可以使用ButtonView类创建我们的Abbreviation工具栏按钮。
我们需要在编辑器的 UIcomponentFactory中注册它,这样它才能在工具栏中显示。
// abbreviation/abbreviationui.js

import { ButtonView, Plugin } from 'ckeditor5';

export default class AbbreviationUI extends Plugin {
    init() {
        const editor = this.editor;

        editor.ui.componentFactory.add( 'abbreviation', () => {
            const button = new ButtonView();

            button.label = 'Abbreviation';
            button.tooltip = true;
            button.withText = true;

            return button;
        } );
    }
}
我们在componentFactory.add中传递了按钮的名称,因此它现在可用于在工具栏配置中使用。我们现在可以在main.js中简单地将其添加到工具栏
// main.js

import Abbreviation from './abbreviation/abbreviation';

ClassicEditor
    .create( document.querySelector( '#editor' ), {
        plugins: [
            Essentials, Paragraph, Heading, List, Bold, Italic, Abbreviation
        ],
        toolbar: [
            'heading', 'bold', 'italic', 'numberedList', 'bulletedList',
            '|',
            'abbreviation'												 // ADDED
        ]
    } );
我们有按钮了,所以让我们定义用户单击它后应该发生什么。
我们将使用insertContent()方法将我们的缩写及其标题属性插入文档。在里面,我们只需要使用writer.createText()创建一个新的文本节点。
// abbreviation/abbreviationui.js

import { ButtonView, Plugin } from 'ckeditor5';

export default class AbbreviationUI extends Plugin {
    init() {
        const editor = this.editor;

        editor.ui.componentFactory.add( 'abbreviation', () => {
            // Previously initialized button view.
            // ...

            this.listenTo( button, 'execute', () => {
                const selection = editor.model.document.selection;
                const title = 'What You See Is What You Get';
                const abbr = 'WYSIWYG';

                // Change the model to insert the abbreviation.
                editor.model.change( writer => {
                    editor.model.insertContent(
                        // Create a text node with the abbreviation attribute.
                        writer.createText( abbr, { abbreviation: title } )
                    );
                } );
            } );

            return button;
        } );
    }
}
# 演示
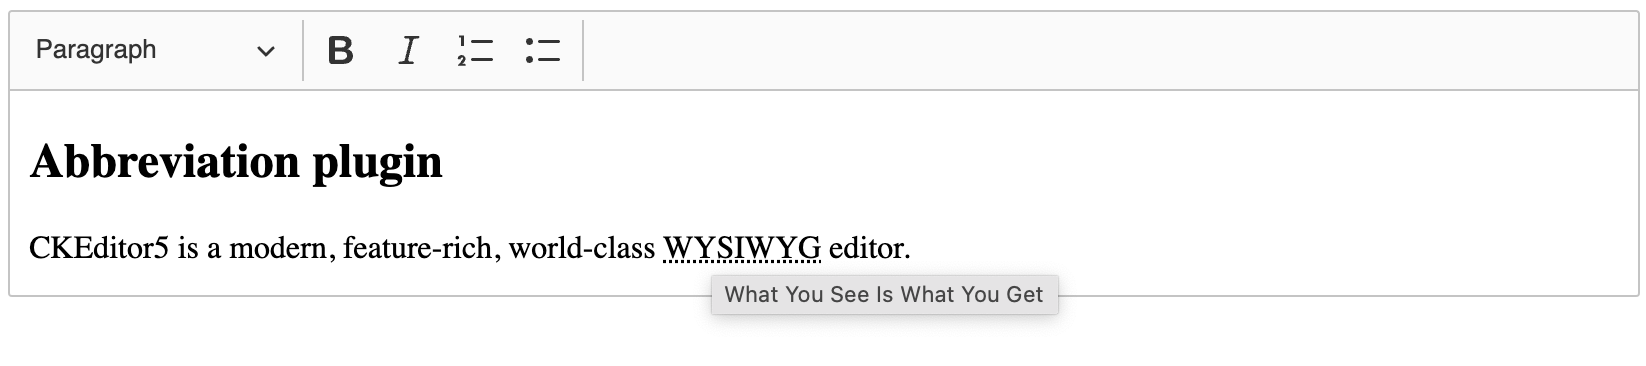
在这里您可以看到结果在行动中。
缩写插件
CKEditor 5 是一个现代的、功能丰富的、世界一流的WYSIWYG 编辑器。
# 最终代码
如果您在任何地方迷路了,这是插件的最终实现。您可以将来自不同文件的代码粘贴到您的项目中,或者克隆和安装整个项目,它将开箱即用。
下一步
本教程的第一部分就到这里!您的插件现在应该可以工作了(至少在最基本的形式中)。继续进行第二部分,您将在其中创建一个带表单的气球来获取用户的输入,替换我们硬编码的“WYSIWYG”缩写。
我们每天都在努力使我们的文档保持完整。您是否发现了过时的信息?是否缺少什么东西?请通过我们的问题跟踪器报告它。
随着 42.0.0 版的发布,我们重新编写了我们的许多文档,以反映新的导入路径和功能。我们感谢您的反馈,以帮助我们确保其准确性和完整性。