

 使用自定义 UI 获取用户输入
在本教程的这一部分中,我们将重点介绍如何创建一个对话框,该对话框将获取用户的输入。
我们将从第一部分结束的地方开始,所以请确保您从那里开始或使用以下命令获取本部分的入门文件。
npx -y degit ckeditor/ckeditor5-tutorials-examples/abbreviation-plugin/part-1 abbreviation-plugin
cd abbreviation-plugin

npm install
npm run dev
由于我们主要处理 UI,建议您在开始编码之前阅读有关UI 库的信息。
如果您想在深入研究之前查看本教程的最终产品,请查看实时演示。
# 创建视图
此插件 UI 中最重要的部分是带有表单的对话框,该对话框将获取用户的输入。
# 创建表单视图模板
让我们从创建一个带有表单的视图开始。它将包括两个输入字段(用于缩写和标题),以及提交和取消按钮。我们将在一个单独的视图中执行此操作。首先,我们在abbreviation/目录中创建一个新的文件abbreviationview.js。
我们的新FormView类将扩展View类,所以让我们从 UI 库中导入它开始。
在FormView构造函数中,我们为缩写表单定义了一个模板。我们需要设置 HTML 元素的标签及其几个属性。为了确保我们的视图可聚焦,让我们添加tabindex="-1"。
// abbreviation/abbreviationview.js

import { View } from 'ckeditor5';

export default class FormView extends View {
    constructor( locale ) {
        super( locale );

        this.setTemplate( {
            tag: 'form',
            attributes: {
                class: [ 'ck', 'ck-abbr-form' ],
                tabindex: '-1'
            }
        } );
    }

}
请注意,我们添加了两个类。编辑器的所有 UI 元素都需要具有ck类(除非您想创建自己的 UI 而不是使用 CKEditor 5 的内置库)。我们还为我们的表单创建了一个新类,我们将在稍后用于对其进行样式设置。
# 创建输入字段
由于我们要创建两个类似的输入字段,并且不想重复自己,所以让我们定义一个方法_createInput(),该方法将为我们生成它们。它将接受输入字段的标签。
我们将使用LabeledFieldView类,并将createLabeledInputText()函数作为第二个参数传递给它。它来自 CKEditor UI 库的助手,将负责创建输入。
// abbreviation/abbreviationview.js

import {
    View,
    LabeledFieldView,				// ADDED
    createLabeledInputText			// ADDED
} from 'ckeditor5';

export default class FormView extends View {
    constructor( locale ) {

        this.abbrInputView = this._createInput( 'Add abbreviation' );
        this.titleInputView = this._createInput( 'Add title' );

        // Previously set template.
        // ...
    }

    _createInput( label ) {
        const labeledInput = new LabeledFieldView( this.locale, createLabeledInputText );

        labeledInput.label = label;

        return labeledInput;
    }
}
# 创建表单按钮
现在,我们将提交和取消按钮添加到我们的表单中。您可以从导入ButtonView开始,并从我们的 UI 库中导入图标,我们将使用这些图标作为标签。
我们将使用核心包的图标库中的check和cancel图标。导入图标后,我们将使用它们来创建按钮。
让我们编写一个_createButton函数,该函数将接受三个参数 - label、icon和className。然后,我们使用之前传递给函数的属性设置按钮属性,并添加工具提示选项。
// abbreviation/abbreviationview.js

import {
    View,
    LabeledFieldView,
    createLabeledInputText,
    ButtonView,		// ADDED
    icons			// ADDED
} from 'ckeditor5';

export default class FormView extends View {
    constructor( locale ) {
        // Previously created inputs.
        // ...

        // Create the save and cancel buttons.
        this.saveButtonView = this._createButton(
            'Save', icons.check, 'ck-button-save'
        );
        // Set the type to 'submit', which will trigger
        // the submit event on entire form when clicked.
        this.saveButtonView.type = 'submit';

        this.cancelButtonView = this._createButton(
            'Cancel', icons.cancel, 'ck-button-cancel'
        );

        // Previously set template.
        // ...
    }

    _createInput( label ) {
        // Input initialization.
        // ...
    }

    _createButton( label, icon, className ) {
        const button = new ButtonView();

        button.set( {
            label,
            icon,
            tooltip: true,
            class: className
        } );

        return button;
    }
}
当用户单击这些按钮中的一个时,我们要么提交要么取消表单视图。这些事件应该从表单视图中发出,因此我们需要将它们从按钮委派到表单视图。
现在,我们将cancelButtonView#execute委派给 FormView,因此按下取消按钮将发出FormView#cancel。我们将在几个步骤中处理提交事件的委派。
// abbreviation/abbreviationview.js

// Previously imported packages.
// ...

export default class FormView extends View {
    constructor( locale ) {
        // Previously created inputs.
        // ...

        this.saveButtonView = this._createButton(
            'Save', icons.check, 'ck-button-save'
        );
        this.saveButtonView.type = 'submit';
        this.cancelButtonView = this._createButton(
            'Cancel', icons.cancel, 'ck-button-cancel'
        );
        // Delegate ButtonView#execute to FormView#cancel.
        this.cancelButtonView.delegate( 'execute' ).to( this, 'cancel' );

        // Previously set template.
        // ...
    }

    _createInput( label ) {
        // Input initialization.
        // ...
    }

    _createButton( label, icon, className ) {
        // Button initialization.
        // ...
    }
}
# 添加样式
我们使用styles.css来为新的 UI 元素设置样式。让我们为我们的表单添加一些填充,并使用CSS 网格布局来很好地显示表单的所有四个元素。
我们将使用我们的设置间距变量来保持一致性。
/* style.css */

.ck.ck-abbr-form {
    padding: var(--ck-spacing-large);
    display: grid;
    grid-template-columns: repeat(2, 1fr);
    grid-template-rows: repeat(3, 1fr);
    grid-column-gap: 0px;
    grid-row-gap: var(--ck-spacing-standard);
}

.ck.ck-abbr-form .ck.ck-labeled-field-view:nth-of-type(1) {
    grid-area: 1 / 1 / 2 / 3;
}

.ck.ck-abbr-form .ck.ck-labeled-field-view:nth-of-type(2) {
    grid-area: 2 / 1 / 3 / 3;
}

.ck.ck-abbr-form .ck-button:nth-of-type(1) {
    grid-area: 3 / 1 / 4 / 2;
}

.ck.ck-abbr-form .ck-button:nth-of-type(2) {
    grid-area: 3 / 2 / 4 / 3;
}
将它导入AbbreviationUI
// abbreviation/abbreviationui.js

import { ButtonView, Plugin } from 'ckeditor5';
import './styles.css';		// ADDED

export default class AbbreviationUI extends Plugin {
    // Definition of Abbreviation UI class.
    // ...
}
# 完成表单视图
我们几乎完成了表单视图,我们只需要添加一些最后的润色。
在constructor中,我们使用createCollection()方法创建了一个ViewCollection。我们将所有输入和按钮视图放入集合中,并使用它来使用新创建的子元素更新FormView模板。
让我们还为我们的FormView添加render()方法。我们将在那里使用一个助手submitHandler()函数,该函数拦截本机 DOM 提交事件,阻止默认的 Web 浏览器行为(导航和页面重新加载),并在视图上发出submit事件。
我们还需要一个focus()方法,该方法将在每次将表单添加到编辑器时,将焦点放在我们abbreviation输入视图的第一个子元素上。这只是对焦点跟踪在 CKEditor 5 中可以做什么的初步了解。我们将在本教程的下一部分中更详细地了解它。
// abbreviation/abbreviationview.js

import {
    View,
    LabeledFieldView,
    createLabeledInputText,
    ButtonView,
    icons,
    submitHandler	// ADDED
} from 'ckeditor5';

export default class FormView extends View {
    constructor( locale ) {
        // Previously created elements.
        // ...

        this.childViews = this.createCollection( [
            this.abbrInputView,
            this.titleInputView,
            this.saveButtonView,
            this.cancelButtonView
        ] );

        this.setTemplate( {
            tag: 'form',
            attributes: {
                // Attributes of a form template.
                // ...
            },
            children: this.childViews	// ADDED
        } );
    }

    render() {
        super.render();

        // Submit the form when the user clicked the save button
        // or pressed enter in the input.
        submitHandler( {
            view: this
        } );
    }

    focus() {
        this.childViews.first.focus();
    }

    _createInput( label ) {
        // Input initialization.
        // ...
    }

    _createButton( label, icon, className ) {
        // Button initialization.
        // ...
    }
}
我们的FormView完成了!但是,我们还不能看到它,所以让我们将其添加到我们的AbbreviationUI类中。
# 添加上下文气球
我们的表单需要出现在气球中,我们将使用 CKEditor 5 UI 库中的ContextualBalloon类来创建一个气球。
这是我们在本教程的第一部分中最终得到的 UI。
// abbreviation/abbreviationui.js

import { ButtonView, Plugin } from 'ckeditor5';

export default class AbbreviationUI extends Plugin {
    init() {
        const editor = this.editor;

        editor.ui.componentFactory.add( 'abbreviation', () => {
            const button = new ButtonView();

            button.label = 'Abbreviation';
            button.tooltip = true;
            button.withText = true;

            this.listenTo( button, 'execute', () => {
                const title = 'What You See Is What You Get';
                const abbr = 'WYSIWYG';

                editor.model.change( writer => {
                    editor.model.insertContent(
                        writer.createText( abbr ),
                        { 'abbreviation': title }
                    );

                } );
            } );

            return button;
        } );
    }
}
我们需要对其进行相当大的更改,并添加ContextualBalloon和FormView。我们需要确保在创建AbbreviationUI实例时需要上下文气球,所以让我们从这里开始。
让我们编写一个基本的_createFormView()函数,仅仅是为了创建一个FormView类的实例(我们将在以后扩展它)。
我们还需要创建一个函数,该函数将从用户的选择中为我们提供气球的目标位置。我们需要将选定的视图范围转换为 DOM 范围。我们可以使用viewRangeToDom()方法来做到这一点。
最后,我们将气球和表单视图添加到init()方法中。
// abbreviation/abbreviationui.js

import {
    ButtonView,
    ContextualBalloon,						// ADDED
    Plugin
} from 'ckeditor5';
import FormView from './abbreviationview';	// ADDED

export default class AbbreviationUI extends Plugin {
    static get requires() {
        return [ ContextualBalloon ];
    }

    init() {
        const editor = this.editor;

        // Create the balloon and the form view.
        this._balloon = this.editor.plugins.get( ContextualBalloon );
        this.formView = this._createFormView();

        editor.ui.componentFactory.add( 'abbreviation', () => {
            // A component factory callback that creates a button.
            // ...
        } );
    }

    _createFormView() {
        const editor = this.editor;
        const formView = new FormView( editor.locale );

        return formView;
    }

    _getBalloonPositionData() {
        const view = this.editor.editing.view;
        const viewDocument = view.document;
        let target = null;

        // Set a target position by converting view selection range to DOM.
        target = () => view.domConverter.viewRangeToDom(
            viewDocument.selection.getFirstRange()
        );

        return {
            target
        };
    }
}
现在我们可以更改用户单击工具栏按钮时发生的事情。我们将用用户定义的缩写替换插入的硬编码缩写。
让我们编写一个_showUI()方法,该方法将通过将表单视图添加到气球并将气球的位置设置为显示我们的 UI 元素。最后一件事情是将焦点设置在表单视图上,以便用户可以立即开始在第一个输入字段中键入。
// abbreviation/abbreviationui.js

// Previously imported packages.
// ...

export default class AbbreviationUI extends Plugin {
    // More methods.
    // ...

    init() {
        // The balloon and the view initialization.
        // ...

        editor.ui.componentFactory.add( 'abbreviation', () => {
            // Button initialization.
            // ...

            // Show the UI on button click.
            this.listenTo( button, 'execute', () => {
                this._showUI();
            } );

            return button;
        } );
    }

    _createFormView() {
        // The form view initialization.
        // ...
    }

    _getBalloonPositionData() {
        // Getting position data for the balloon.
        // ...
    }

    _showUI() {
        this._balloon.add( {
            view: this.formView,
            position: this._getBalloonPositionData()
        } );

        this.formView.focus();
    }
}
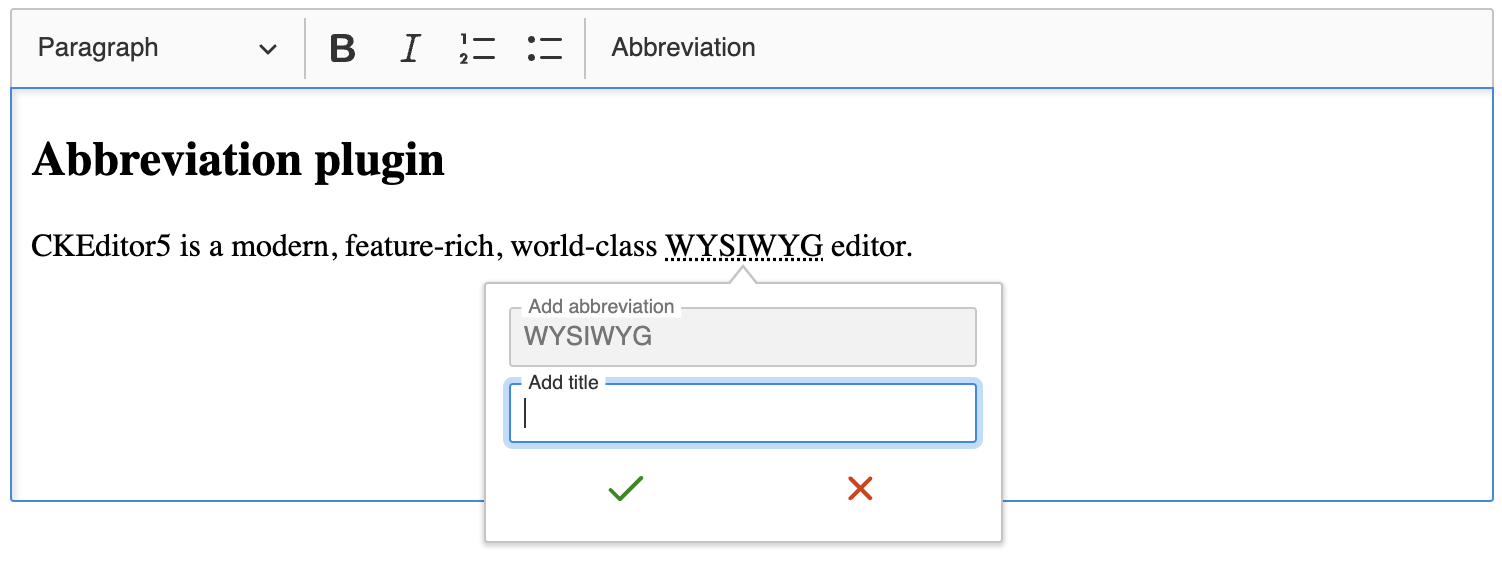
您现在应该能够看到您的气球和表单!检查并查看您的气球弹出(我们很快就会谈到如何隐藏它)。它应该看起来像这样
# 获取用户输入
现在是时候用用户输入替换硬编码的“WYSIWYG”缩写了。我们将从表单中获取值,并监听表单视图上的submit事件,该事件是我们从保存按钮(借助submitHandler)委派的。
我们使用与我们在教程第一部分中工具栏按钮中使用的相同的回调函数。我们只需要用来自输入视图的值替换“WYSIWYG”缩写即可。
// abbreviation/abbreviationui.js

// Previously imported packages.
// ...

export default class AbbreviationUI extends Plugin {
    static get requires() {
        return [ ContextualBalloon ];
    }

    init() {
        // The balloon and the view initialization.
        // ...
    }

    _createFormView() {
        const editor = this.editor;
        const formView = new FormView( editor.locale );

        this.listenTo( formView, 'submit', () => {
            const title = formView.titleInputView.fieldView.element.value;
            const abbr = formView.abbrInputView.fieldView.element.value;

            editor.model.change( writer => {
                editor.model.insertContent(
                    writer.createText( abbr, { abbreviation: title } )
                );
            } );

        } );

        return formView;
    }

    _getBalloonPositionData() {
        // Getting position data for the balloon.
        // ...
    }

    _showUI() {
        // Displaying balloon for the user.
        // ...
    }
}
我们的插件终于按照预期执行了。最后一件事情是在不需要它时将其从编辑器中隐藏。
# 隐藏表单视图
在以下三种情况下,我们需要隐藏表单视图:
- 用户提交表单后;
- 用户点击 取消 按钮时;
- 用户点击气泡外部时。
我们将编写一个简单的 _hideUI() 函数,它将清除输入字段的值并从我们的气泡中移除视图。
此外,我们将导入 clickOutsideHandler() 方法,该方法将以我们的 _hideUI() 函数作为回调。它将从我们的表单视图发出,并在表单视图可见时激活。我们还需要为处理程序设置 contextElements 以确定其范围。点击其中列出的 HTML 元素将不会触发回调。
// abbreviation/abbreviationui.js

// Previously imported packages.
// ...

import { ContextualBalloon, clickOutsideHandler } from 'ckeditor5'; // ADDED

export default class AbbreviationUI extends Plugin {
    static get requires() {
        return [ ContextualBalloon ];
    }

    init() {
        // The balloon and the view initialization.
        // ...
    }

    _createFormView() {
        const editor = this.editor;
        const formView = new FormView( editor.locale );

        this.listenTo( formView, 'submit', () => {
            // Setting texts: title and abbreviation.
            // ...

            // Hide the form view after submit.
            this._hideUI();
        } );

        // Hide the form view after clicking the "Cancel" button.
        this.listenTo( formView, 'cancel', () => {
            this._hideUI();
        } );

        // Hide the form view when clicking outside the balloon.
        clickOutsideHandler( {
            emitter: formView,
            activator: () => this._balloon.visibleView === formView,
            contextElements: [ this._balloon.view.element ],
            callback: () => this._hideUI()
        } );

        return formView;
    }

    _hideUI() {
        this.formView.abbrInputView.fieldView.value = '';
        this.formView.titleInputView.fieldView.value = '';
        this.formView.element.reset();

        this._balloon.remove( this.formView );

        // Focus the editing view after closing the form view.
        this.editor.editing.view.focus();
    }

    _getBalloonPositionData() {
        // Getting position data for the balloon.
        // ...
    }

    _showUI() {
        // Displaying balloon for the user.
        // ...
    }
}
# 演示
查看实际效果。
缩写插件
CKEditor 5 是一个现代、功能丰富、世界一流的 WYSIWYG 编辑器。
# 最终代码
如果您在任何时候迷路了,这里是 插件的最终实现。您可以将代码从不同的文件粘贴到您的项目中,或者克隆并安装整个项目,它将开箱即用。
我们每天都在努力使我们的文档保持完整。您是否发现过时的信息?是否缺少某些内容?请通过我们的 问题追踪器 报告。
随着 42.0.0 版本的发布,我们重写了大部分文档以反映新的导入路径和功能。我们感谢您的反馈,以帮助我们确保其准确性和完整性。