

 批注显示模式
有三种内置 UI 用于显示评论线程和建议批注:宽边栏、窄边栏和内联气泡。您也可以在更高级的场景中将它们一起显示,其中各种批注来源(评论、建议)与不同的 UI 相连,甚至可以为批注创建自己的 UI。
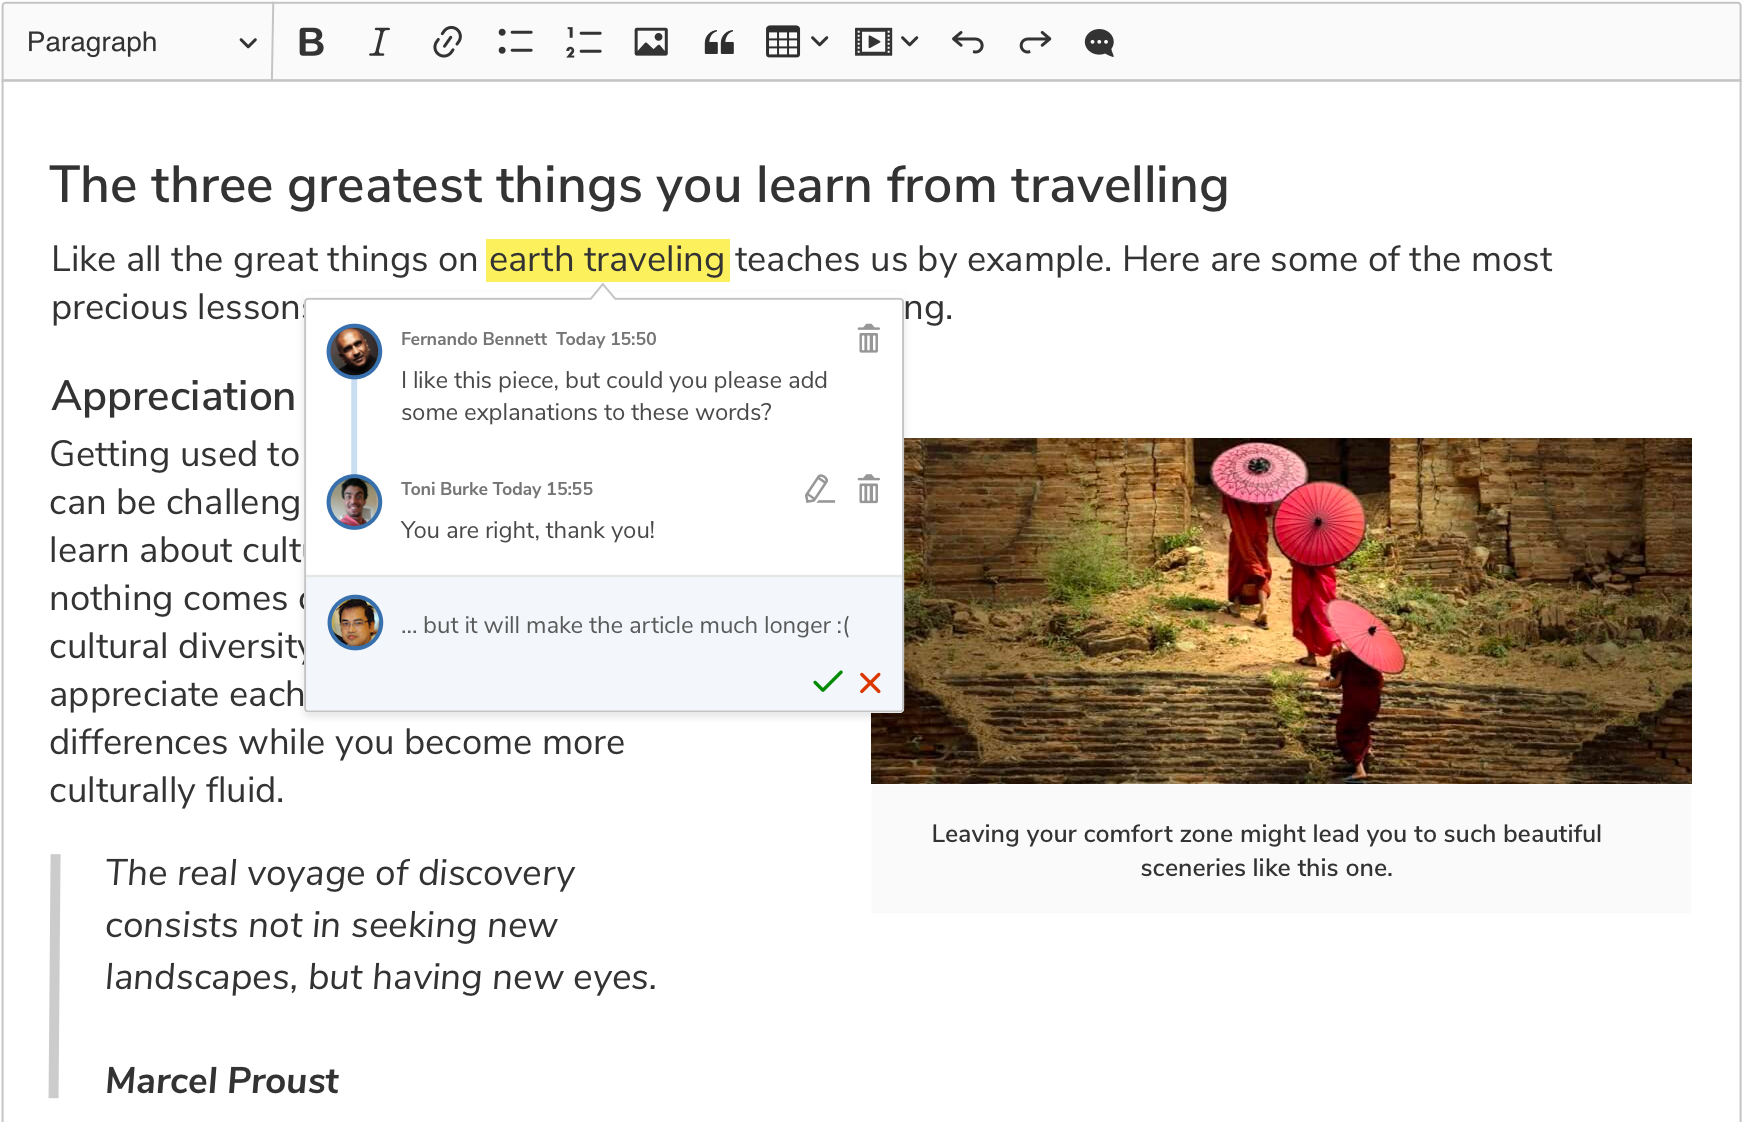
# 内联气泡
内联气泡显示模式专为窄屏幕(如移动设备)和使用 WYSIWYG 编辑器编辑内容一小部分的 UI 而设计。
内联显示模式是默认解决方案。当未指定边栏配置时使用它。
即使设置了边栏配置,您也可以通过使用'inline'参数调用switchTo()方法动态切换到内联显示模式
// ...

ClassicEditor
    .create( document.querySelector('#editor'), editorConfig )
    .then( editor => {
        editor.plugins.get( 'AnnotationsUIs' ).switchTo( 'inline' );

        // The sidebar container is not removed automatically,
        // so it is up to your integration to hide it (or manage in another way).
        document.querySelector( '.editor-container__sidebar' ).style.display = 'none';
    } );
目前,内联气泡 UI 仅适用于编辑器批注,不能与上下文功能一起使用。
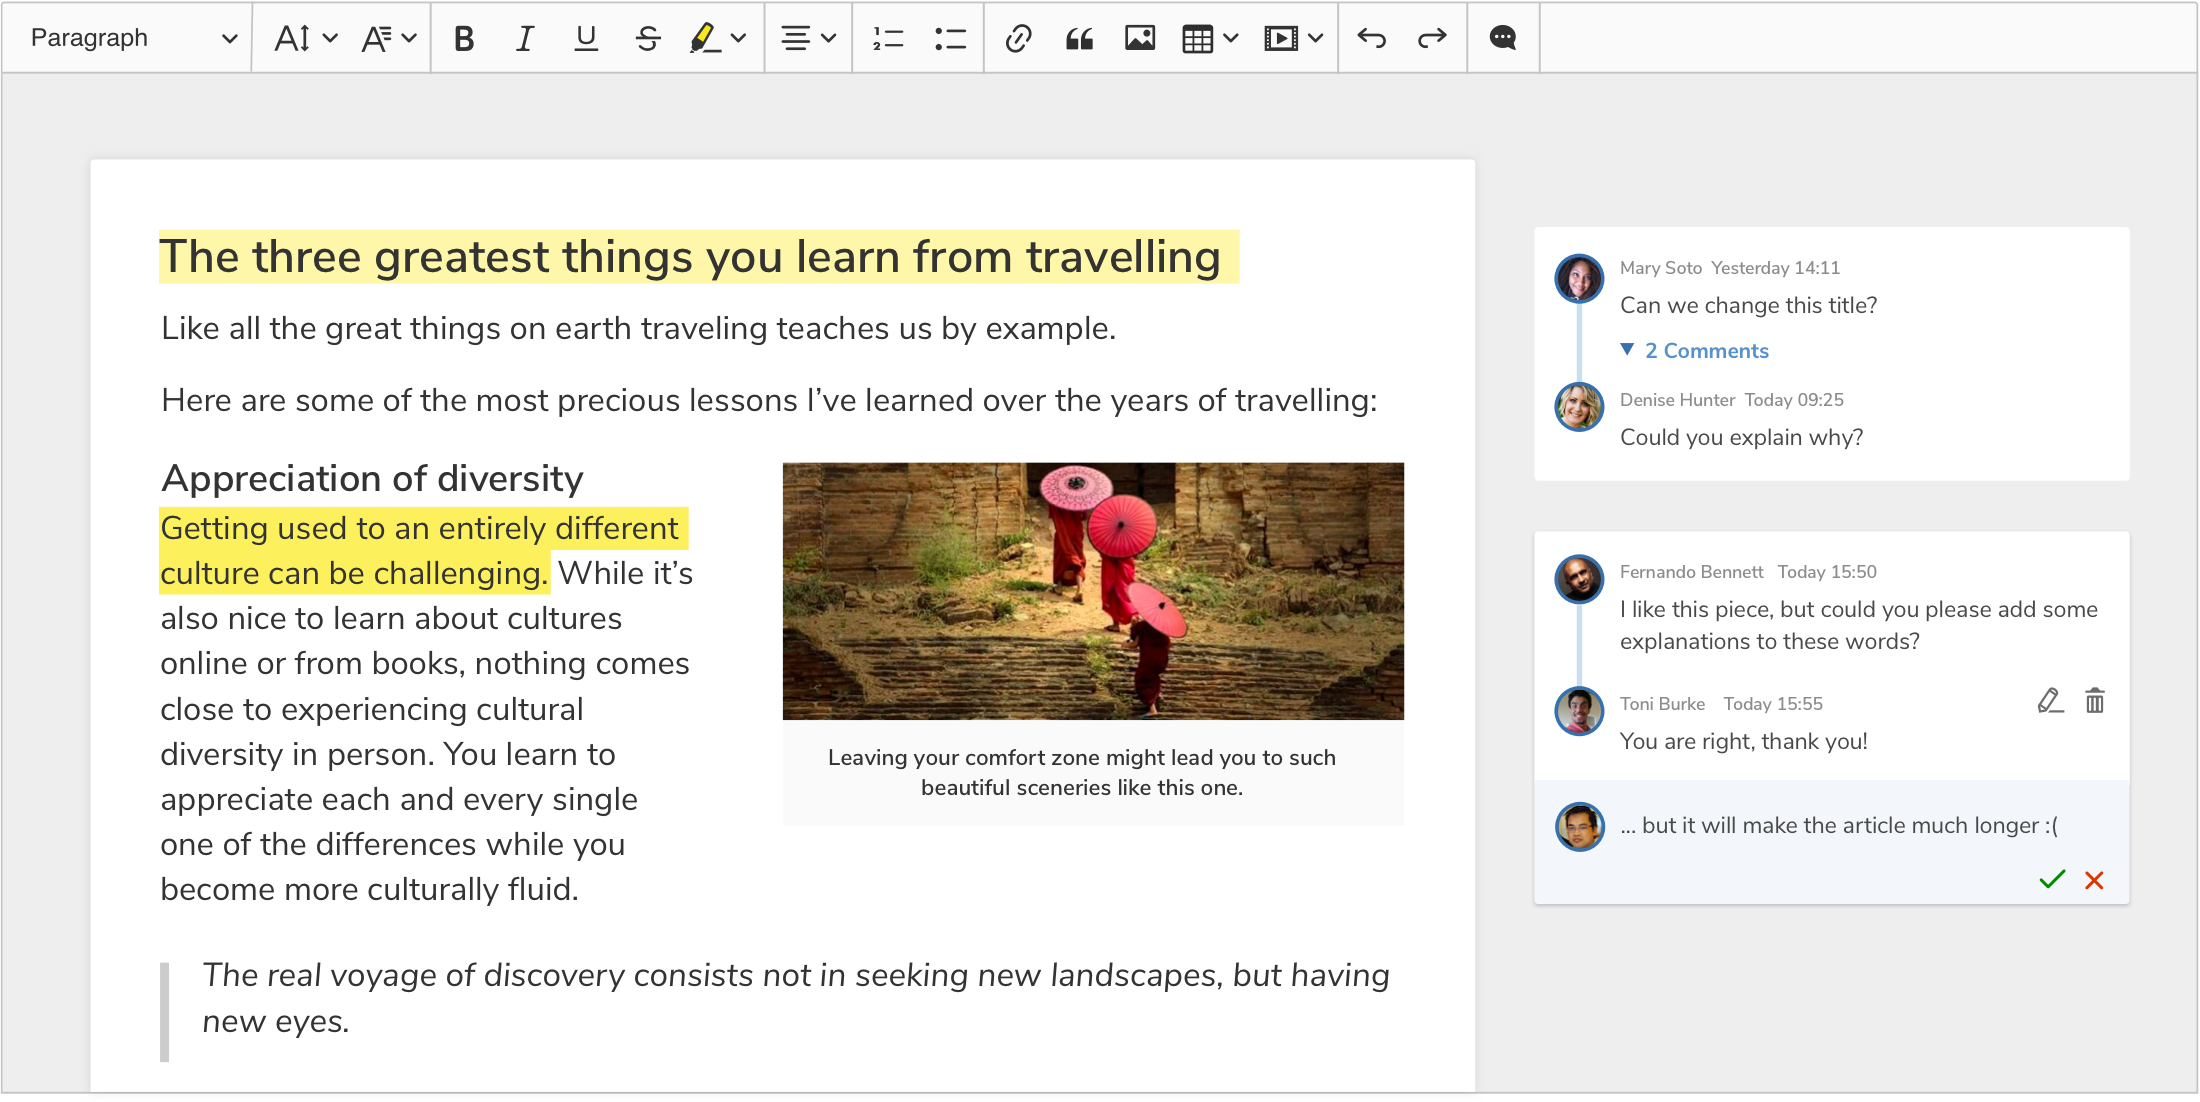
# 宽边栏
宽边栏可以容纳最多的信息量。在此模式下,用户可以看到每个讨论的开头和结尾,以及当前选中标记的整个讨论。只要有足够的空间,它就是推荐的解决方案。
如果您是从评论集成指南中来到这里的,您的编辑器将已经以宽边栏模式显示批注,并且不需要任何额外的配置。以下说明适用于需要在显示模式之间切换或自定义边栏的场景。
要使用宽边栏显示评论和建议批注,首先,准备适当的 HTML 结构
<!DOCTYPE HTML>
<html>
    <head>
        <meta charset="utf-8" />
        <title>CKEditor 5 Sample</title>
    </head>
    <body>
        <div class="main-container">
            <div class="editor-container editor-container--classic-editor editor-container--include-annotations" id="editor-container">
                <div class="editor-container__editor-wrapper">
                    <div class="editor-container__editor"><div id="editor"></div></div>
                    <div class="editor-container__sidebar"><div id="editor-annotations"></div></div>
                </div>
            </div>
        </div>
        <script type="module" src="./main.js"></script>
    </body>
</html>
然后更新 CSS 样式以在编辑器的右侧显示边栏
.editor-container {
    --ckeditor5-preview-sidebar-width: 270px;
}

.editor-container__editor-wrapper {
    display: flex;
    width: fit-content;
}

.editor-container--classic-editor .editor-container__editor {
    min-width: 795px;
    max-width: 795px;
}

.editor-container__sidebar {
    min-width: var(--ckeditor5-preview-sidebar-width);
    max-width: var(--ckeditor5-preview-sidebar-width);
    margin-top: 28px;
    margin-left: 10px;
    margin-right: 10px;
}
然后,初始化富文本编辑器。在配置中,将编辑器设置为使用<div id="editor-annotations">元素作为评论容器。
// ...

const editorConfig = {
    // ...

    sidebar: {
        container: document.querySelector('#editor-annotations')
    },

    // ...
}

ClassicEditor.create( document.querySelector('#editor'), editorConfig );
在设置了如上例所示的配置后,将使用宽边栏显示模式。如果显示模式已更改,您可以通过调用switchTo()将其更改回
ClassicEditor
    .create( document.querySelector('#editor'), editorConfig )
    .then( editor => {
        editor.plugins.get( 'AnnotationsUIs' ).switchTo( 'wideSidebar' );
    } );
您也可以使用setContainer()方法动态设置边栏容器
ClassicEditor
    .create( document.querySelector('#editor'), editorConfig )
    .then( editor => {
        editor.plugins.get( 'Sidebar' ).setContainer( element );
    } );
如果边栏容器已设置,则其中所有的项目将被移动到新的容器中。
# 窄边栏
窄边栏是宽边栏和内联气泡之间的折衷方案。它不像宽边栏那样占用大量空间,但包含的信息比内联批注更多。用户会立即看到何时将多个评论线程添加到同一个位置,以及添加了多少评论。

宽边栏和窄边栏的 HTML 结构类似。唯一的区别是您需要为#editor-annotations元素设置不同的min-width CSS 属性
/* ... */

.editor-container__sidebar {
    min-width: 65px;
}

/* ... */
然后,初始化编辑器并使用switchTo()方法将 UI 切换到narrowSidebar模式。请注意,您需要手动切换 UI 类型,因为默认情况下将显示宽边栏。
// ...

const editorConfig = {
    // ...

    sidebar: {
        container: document.querySelector('#editor-annotations')
    },

    // ...
}

ClassicEditor
    .create( document.querySelector('#editor'), editorConfig );
    .then( editor => {
        editor.plugins.get( 'AnnotationsUIs' ).switchTo( 'narrowSidebar' );
    } );
# 多个 UI
批注旨在支持同时显示各种批注 UI。这使您能够在不同位置显示不同的批注来源,例如,在宽边栏中显示评论,同时在内联气泡中显示建议。
要同时激活多个 UI,应将过滤函数传递给activate()方法。该函数指定哪个批注由给定的 UI 控制。请注意,一个批注不能同时由多个AnnotationsUI管理。如果批注未被任何批注 UI 接受,则该批注将不会显示。
要使用批注 UI 的组合显示评论和建议批注,首先准备适当的 HTML 结构(出于演示目的,使用宽边栏)
<html>
    <head>
        <style type="text/css">
          #container {
                display: flex;
                position: relative;
            }

            #container .ck.ck-editor {
                width: 100%;
                max-width: 700px;
            }

            #sidebar {
                min-width: 300px;
                padding: 0 10px;
            }
        </style>
    </head>
    <body>
        <div id="container">
            <div id="editor"></div>
            <div id="sidebar"></div>
        </div>
    </body>
</html>
然后,使用包含注释和修订跟踪功能的预设来初始化富文本编辑器。您可以从修订跟踪集成指南中获取必要的代码。然后调整代码以使用两个注释 UI,如下所示
// ...

ClassicEditor
    .create( document.querySelector('#editor'), editorConfig )
    .then( editor => {
        const annotationsUIs = editor.plugins.get( 'AnnotationsUIs' );

        // Deactivate all UIs first as the `activate()` method might not deactivate all UIs.
        annotationsUIs.deactivateAll();

        annotationsUIs.activate( 'wideSidebar', annotation => annotation.type === 'comment' );
        annotationsUIs.activate( 'inline', annotation => annotation.type !== 'comment' );
    } );
# 所有显示模式的实际操作
以下代码片段允许在所有可用的显示模式之间切换。
作为对本指南的补充,我们提供了一个可供下载的示例。您可以将示例用作示例或作为您自己的集成的起点。请注意,此示例不仅涵盖注释,还涵盖修订跟踪建议。
以下代码片段需要包含注释和修订跟踪插件的设置。查看修订跟踪集成指南以获取代码。
在从 Builder 获取的index.html文件中,添加以下标记
<body>
    <!-- ... -->
    <div class="buttons">
        <button id="inline">Inline</button>
        <button id="narrow">Narrow sidebar</button>
        <button id="wide">Wide sidebar</button>
        <button id="wide-inline">Wide sidebar + inline</button>
    </div>
    <!-- ... -->
</body>
然后,在style.css文件中,添加以下样式
.editor-container__sidebar {
    transition: min-width .4s ease-out-in;
}

.editor-container__sidebar.narrow {
    min-width: 65px;
}

.editor-container__sidebar.hidden {
    display: none;
}
最后,在main.js文件中添加以下代码
ClassicEditor
    .create( document.querySelector('#editor'), editorConfig )
    .then( editor => {
        const annotationsUIs = editor.plugins.get( 'AnnotationsUIs' );
        const annotationsContainer = document.querySelector( '.editor-container__sidebar' );
        const inlineButton = document.querySelector( '#inline' );
        const narrowButton = document.querySelector( '#narrow' );
        const wideButton = document.querySelector( '#wide' );
        const wideAndInlineButton = document.querySelector( '#wide-inline' );

        function markActiveButton( button ) {
            [ inlineButton, narrowButton, wideButton, wideAndInlineButton ]
                .forEach( el => el.classList.toggle( 'active', el === button ) );
        }

        function switchToInline() {
            markActiveButton( inlineButton );
            annotationsContainer.classList.remove( 'narrow' );
            annotationsContainer.classList.add( 'hidden' );
            annotationsUIs.switchTo( 'inline' );
        }

        function switchToNarrowSidebar() {
            markActiveButton( narrowButton );
            annotationsContainer.classList.remove( 'hidden' );
            annotationsContainer.classList.add( 'narrow' );
            annotationsUIs.switchTo( 'narrowSidebar' );
        }

        function switchToWideSidebar() {
            markActiveButton( wideButton );
            annotationsContainer.classList.remove( 'narrow', 'hidden' );
            annotationsUIs.switchTo( 'wideSidebar' );
        }

        function switchToWideSidebarAndInline() {
            markActiveButton( wideAndInlineButton );
            annotationsContainer.classList.remove( 'narrow', 'hidden' );

            annotationsUIs.deactivateAll();
            annotationsUIs.activate( 'wideSidebar', annotation => annotation.type === 'comment' );
            annotationsUIs.activate( 'inline', annotation => annotation.type !== 'comment' );
        }

        editor.ui.view.listenTo( inlineButton, 'click', () => switchToInline() );
        editor.ui.view.listenTo( narrowButton, 'click', () => switchToNarrowSidebar() );
        editor.ui.view.listenTo( wideButton, 'click', () => switchToWideSidebar() );
        editor.ui.view.listenTo( wideAndInlineButton, 'click', () => switchToWideSidebarAndInline() );

        // Set wide sidebar as default.
        switchToWideSidebar();
    } )
    .catch( error => console.error( error ) );
# 演示
以下示例展示了上面的代码片段
# 自定义 UI
除了内置的注释 UI 之外,还可以创建自定义 UI,以更适合您的应用程序的方式显示注释。
请注意,注释 UI 应该实现AnnotationsUI接口。
注释 UI 的框架如下所示。为了使其正常工作,它必须包含在编辑器插件列表中并被激活。这些是您需要对项目main.js文件进行的更改
// ...

import { ContextPlugin } from 'ckeditor5';

// ...

class CustomAnnotationsUI extends ContextPlugin {
    static get pluginName() {
        return 'CustomAnnotationsUI';
    }

    constructor( ...args ) {
        super( ...args );

        // The `activeAnnotation` property should be defined as an observable property.
        this.set( 'activeAnnotation', null );
    }

    // The `attach()` method should create everything needed for the UI and
    // attach all listeners. This method is called when the UI is activated.
    //
    // The observable collection of annotations is passed as the first argument,
    // and the annotations UI is responsible for reacting to its changes.
    attach( annotations ) {
        // Do something when an annotation is added.
        this.listenTo( annotations, 'add', ( evt, annotation ) => { /* ... */ } );

        // Do something when an annotation is removed.
        this.listenTo( annotations, 'remove', ( evt, annotation ) => { /* ... */ } );
    }

    // The `detach()` method should destroy the UI and remove all listeners.
    // This method is called when the UI is deactivated.
    detach() {
        this.stopListening();
    }

    // The `setActiveAnnotation()` method should set or unset the active annotation.
    setActiveAnnotation( annotation ) {
        if ( this.activeAnnotation ) {
            this.activeAnnotation.isActive = false;

            // You can do something in your UI with the annotation that is no longer active.
            // ...
        }

        if ( annotation ) {
            this.activeAnnotation = annotation;
            this.activeAnnotation.isActive = true;

            // You can do something in your UI to highlight the active annotation.
            // ...
        }
    }
}

// ...

const editorConfig = {
    // ...

    plugins: [ /* ... */, CustomAnnotationsUI ],

    // ...
};

ClassicEditor
    .create( document.querySelector('#editor'), editorConfig )
    .then( editor => {
        const annotationsUIs = editor.plugins.get( 'AnnotationsUIs' );
        const customAnnotationsPlugin = editor.plugins.get( 'CustomAnnotationsUI' );

        annotationsUIs.register( 'customUI', customAnnotationsPlugin );
        annotationsUIs.switchTo( 'customUI' );
    } );
我们每天都在努力使我们的文档保持完整。您是否发现了过时的信息?是否缺少内容?请通过我们的问题跟踪器报告。
随着 42.0.0 版本的发布,我们重新编写了大部分文档以反映新的导入路径和功能。感谢您的反馈,帮助我们确保其准确性和完整性。